Roll a quiver against an explicit name list

Updated
Tier 2 Economy or higher for the embedded-tree example.

Roll a quiver against an explicit name list

Read the written guide

Follow each step in the app. Numbered markers show the real controls. To connect nodes, drag from output marker 1 to input marker 2. Connection maps show the completed route. Steps outside the app name where to continue.

  1. At a glance

    1. Read the scope

    Read the practice target and changes from the saved sample.

    The scope and limits are clear.

    Read and complete this step before continuing.

  2. Before you start

    2. Prepare the setup and test item

    Complete [setup](setup-first-run.md), configure Alteration and Augmentation, and enable [Orb stock guard](orb-stock-guard.md). Prepare a disposable identified, uncorrupted magic quiver. Verify advanced copied item information for name and prefix checks.

    Local captures, materials and input suitability are checked.

    Read and complete this step before continuing.

  3. 1. Create a personal practice tree

    3. Create a personal tree

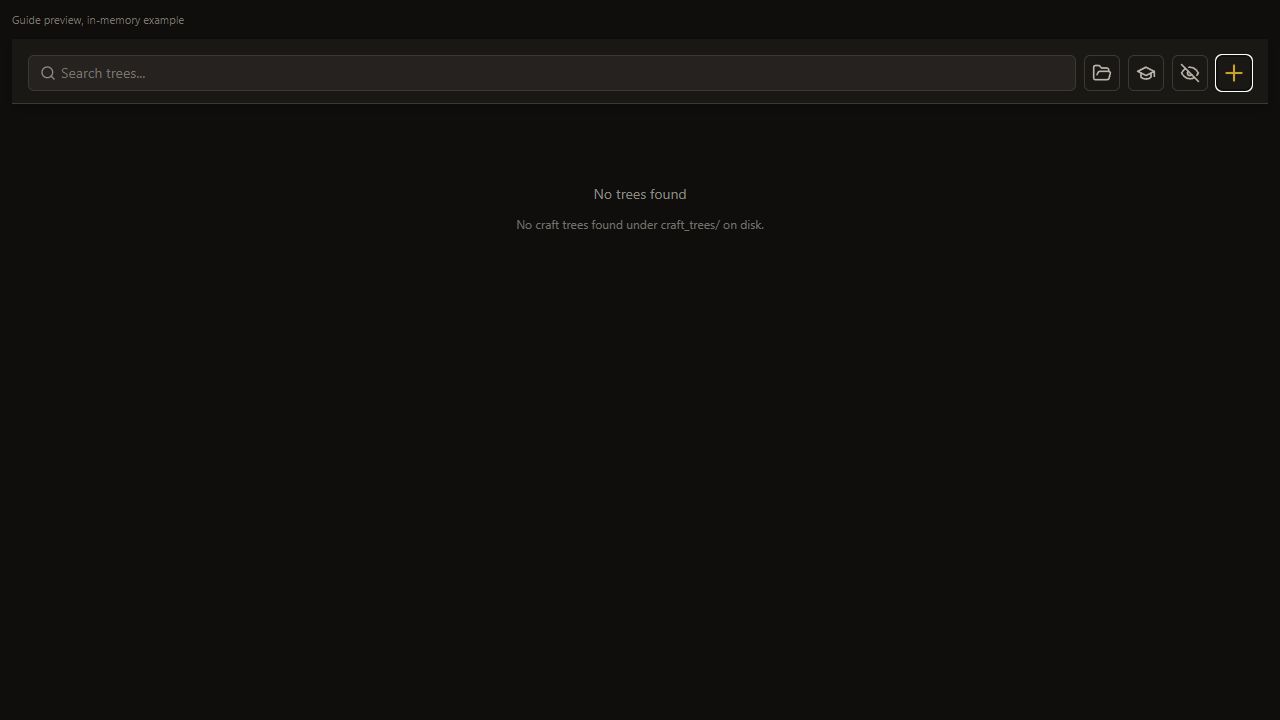
    Choose + on the Hub.

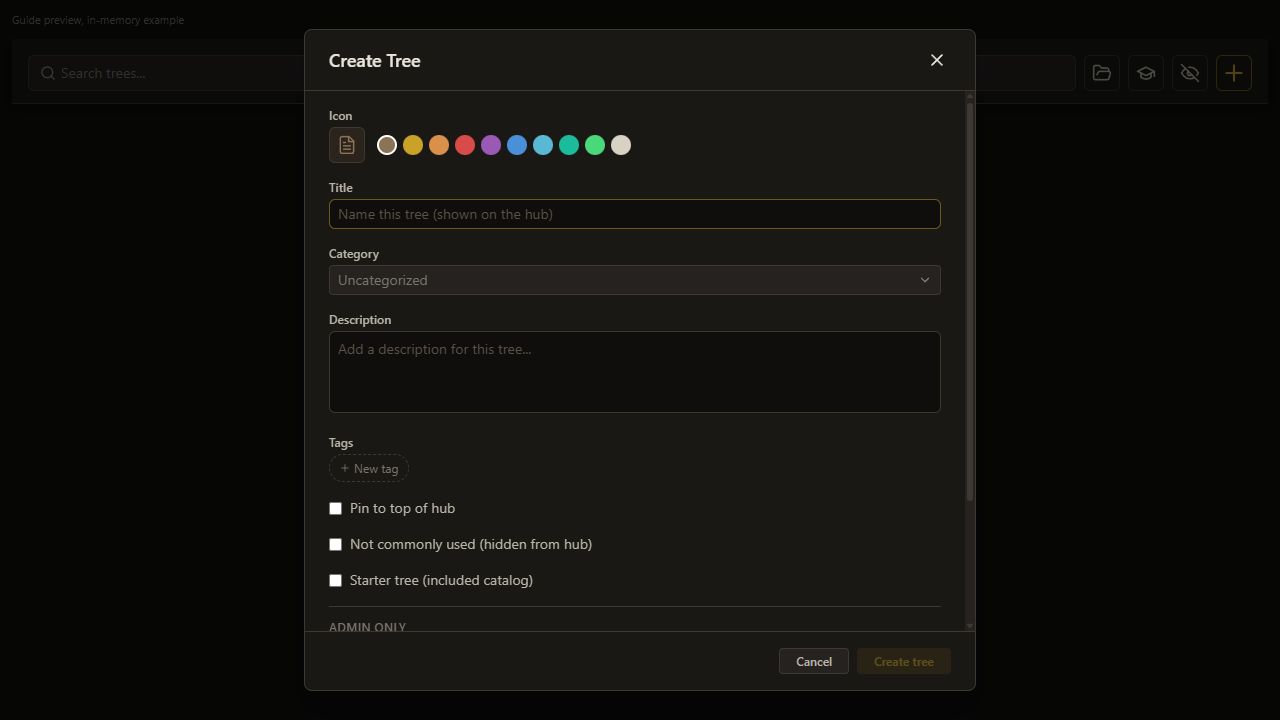
    Create Tree opens.

    Open full-size screenshot
  4. 1. Create a personal practice tree

    4. Name the tree

    Set Name this tree (shown on the hub) to Quiver names practice.

    Name this tree (shown on the hub) keeps the selected value.

    Open full-size screenshot
  5. 1. Create a personal practice tree

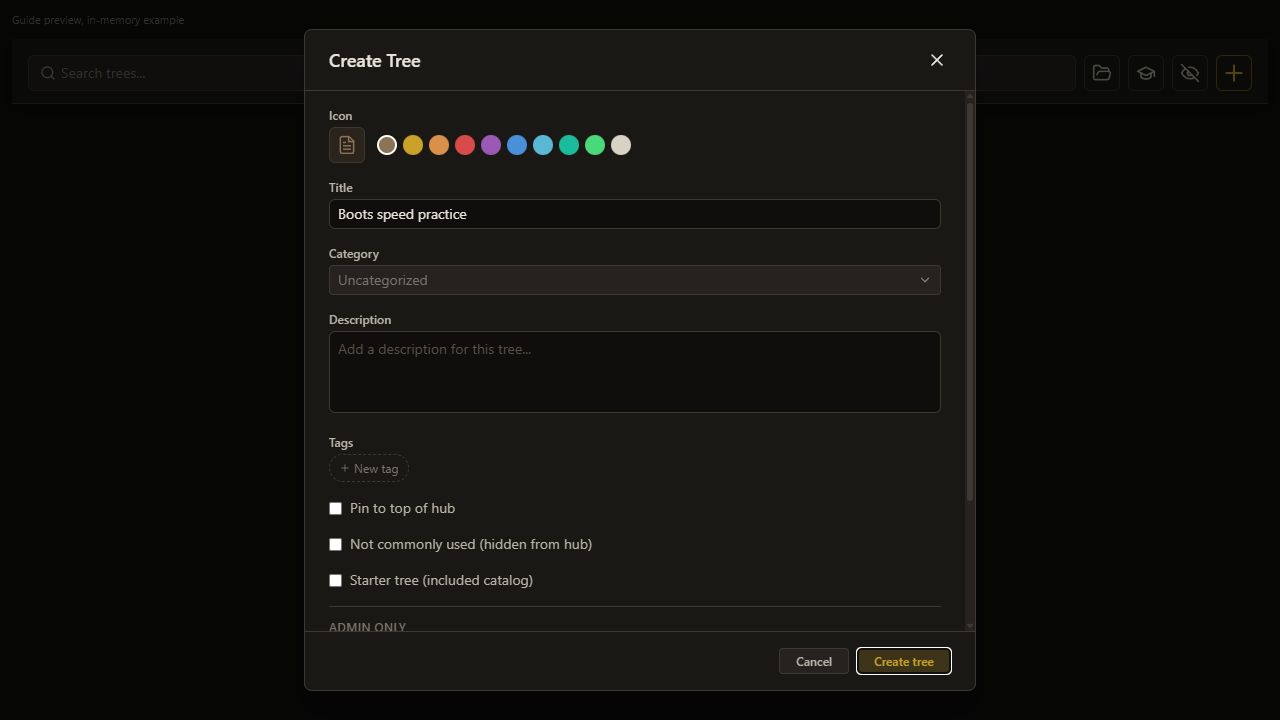
    5. Create the tree

    Choose Create tree.

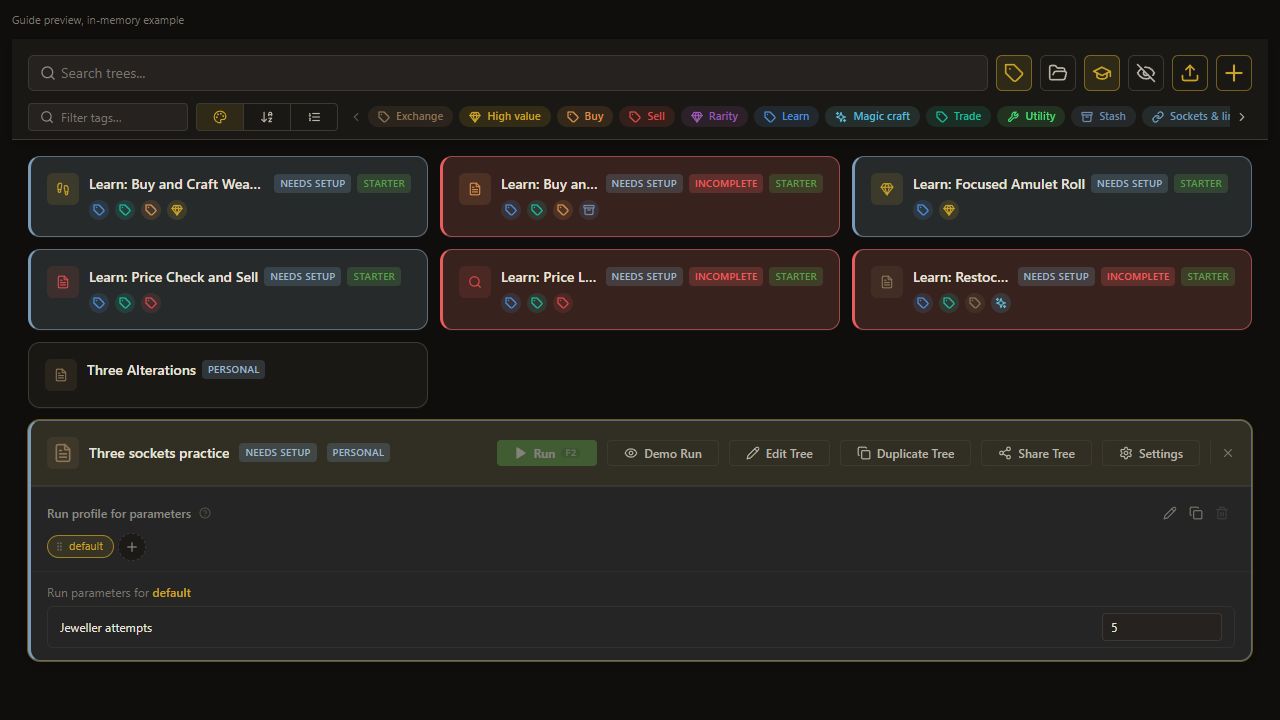
    The personal tree appears on the Hub.

    Open full-size screenshot
  6. 1. Create a personal practice tree

    6. Open the editor

    Choose Edit Tree.

    The production editor opens.

    Open full-size screenshot
  7. 1. Create a personal practice tree

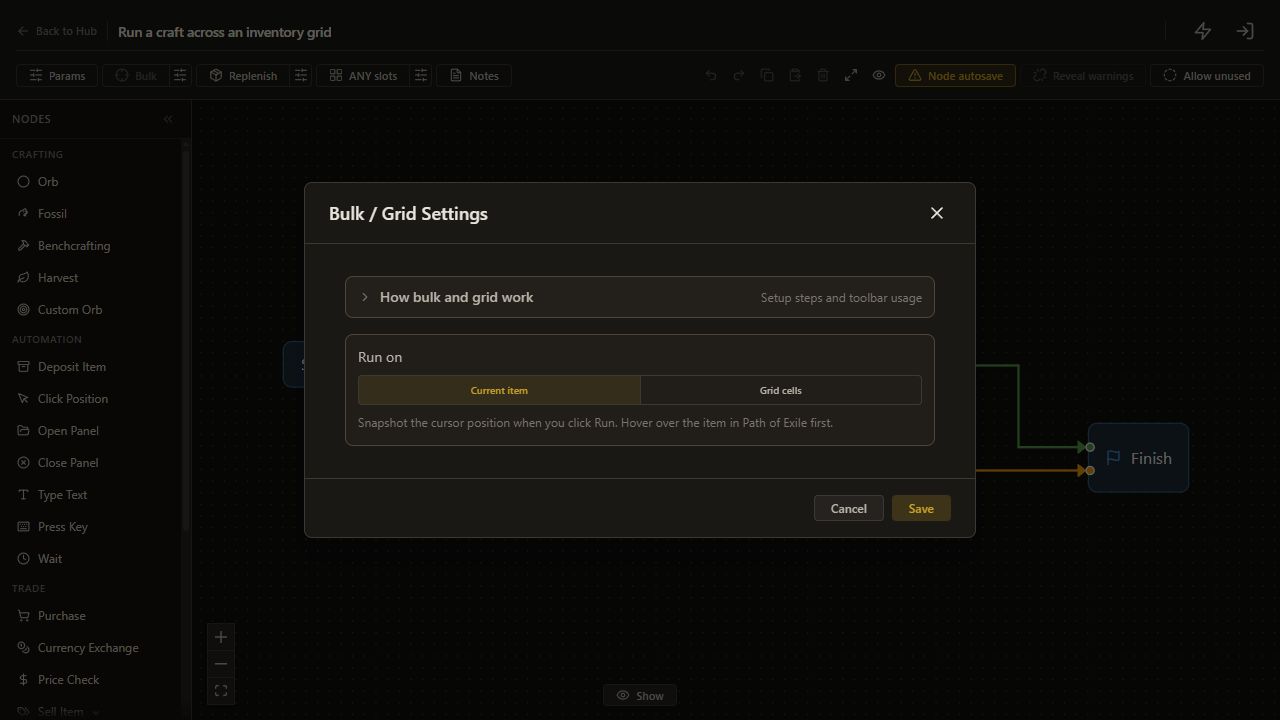
    7. Open Bulk settings

    Click the sliders button beside Bulk, labeled Configure bulk / grid settings.

    The Bulk settings dialog opens.

    Open full-size screenshot
  8. 1. Create a personal practice tree

    8. Use one item

    Click Current item in the Bulk settings dialog.

    Current item is selected in the dialog; click Save next.

    Open full-size screenshot
  9. 1. Create a personal practice tree

    9. Save one-item mode

    Click Save in the Bulk settings dialog.

    Current item is saved and the dialog closes.

    Open full-size screenshot
  10. 2. Prepare the entry path

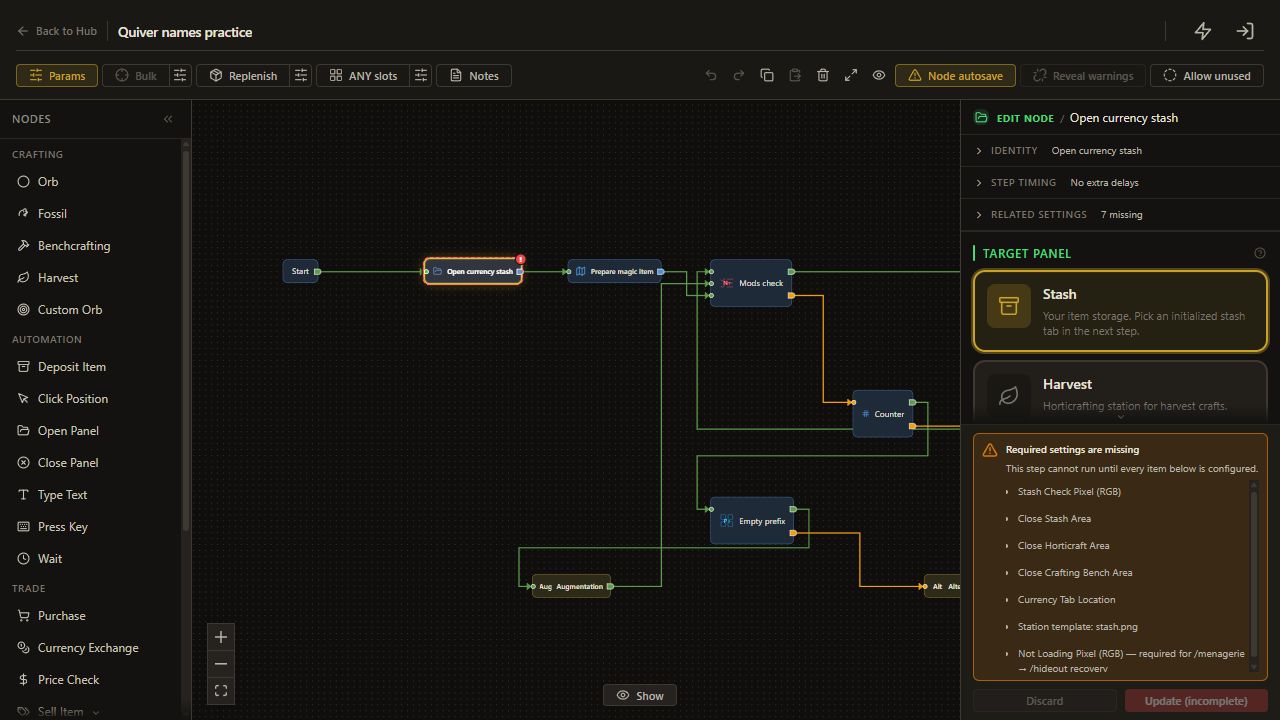
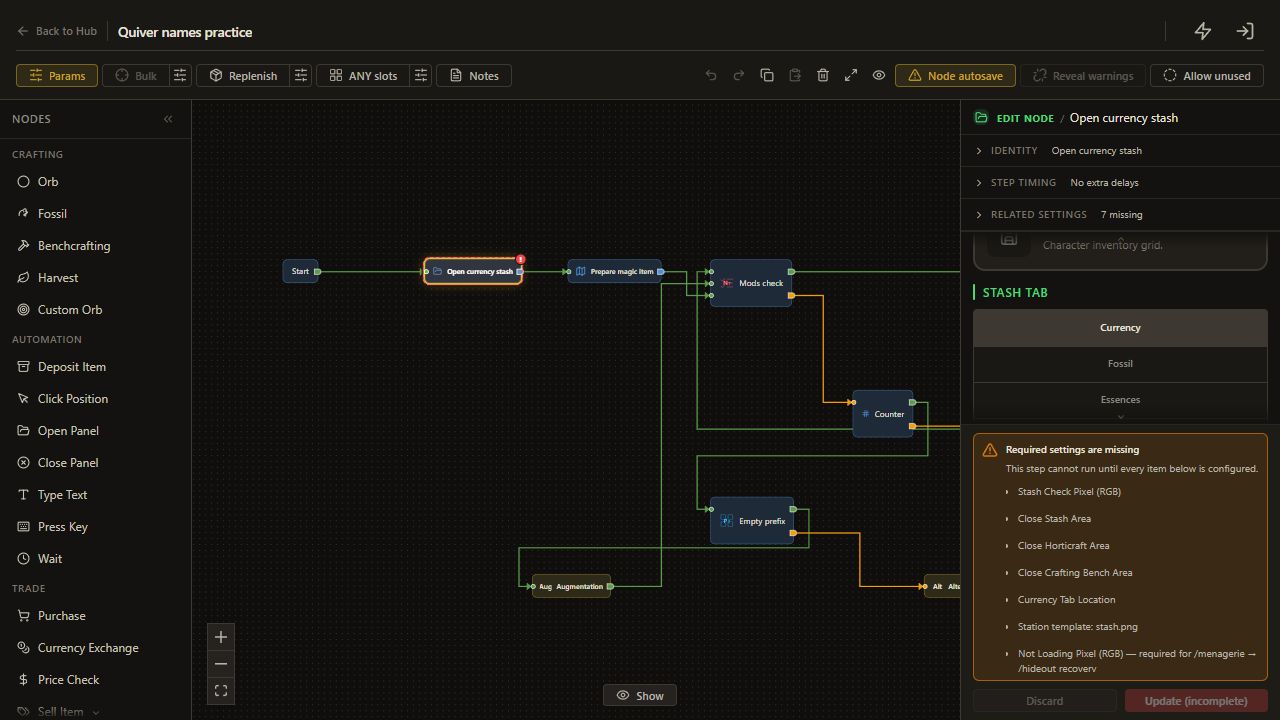
    10. Add Open currency stash

    Choose Open Panel.

    The node appears on the canvas and its settings open.

    Open full-size screenshot
  11. 2. Prepare the entry path

    11. Open the stash

    Choose Stash.

    Open Panel targets the stash.

    Open full-size screenshot
  12. 2. Prepare the entry path

    12. Select the currency tab

    Choose Currency.

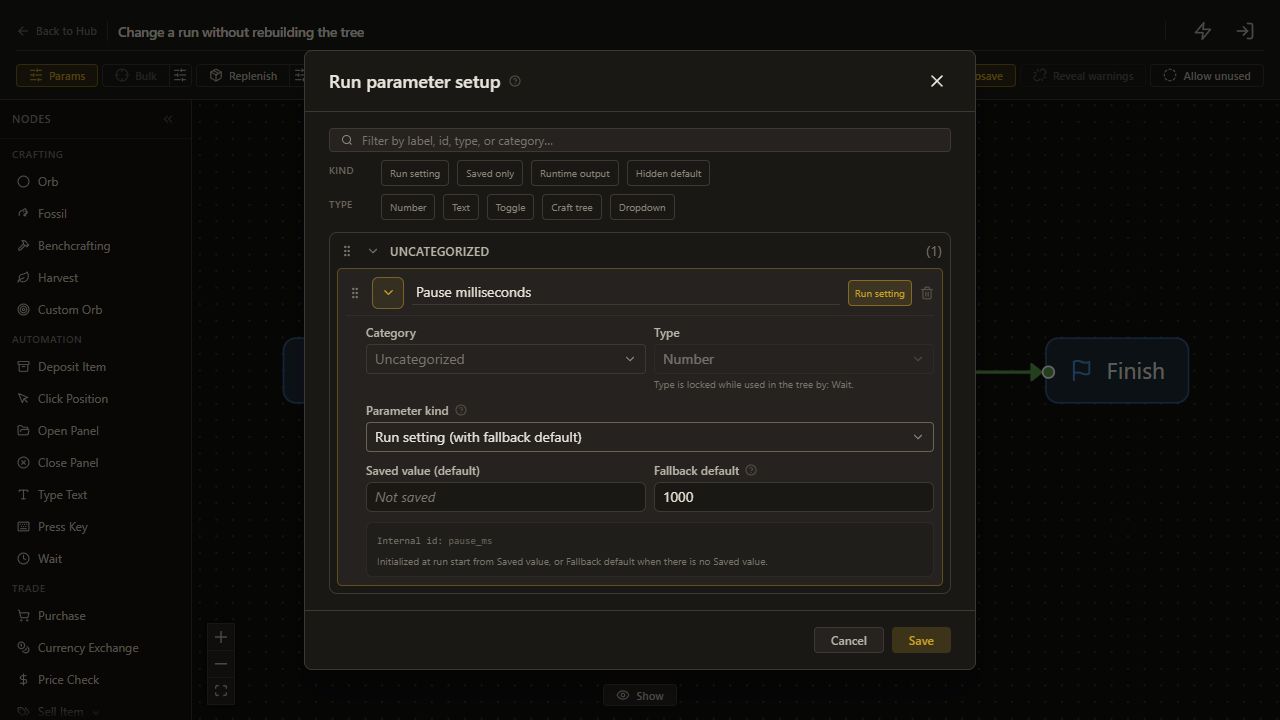
    The configured currency tab is selected.

    Open full-size screenshot
  13. 2. Prepare the entry path

    13. Prepare the child

    Complete case-force-magic, then return.

    The personal child is tested.

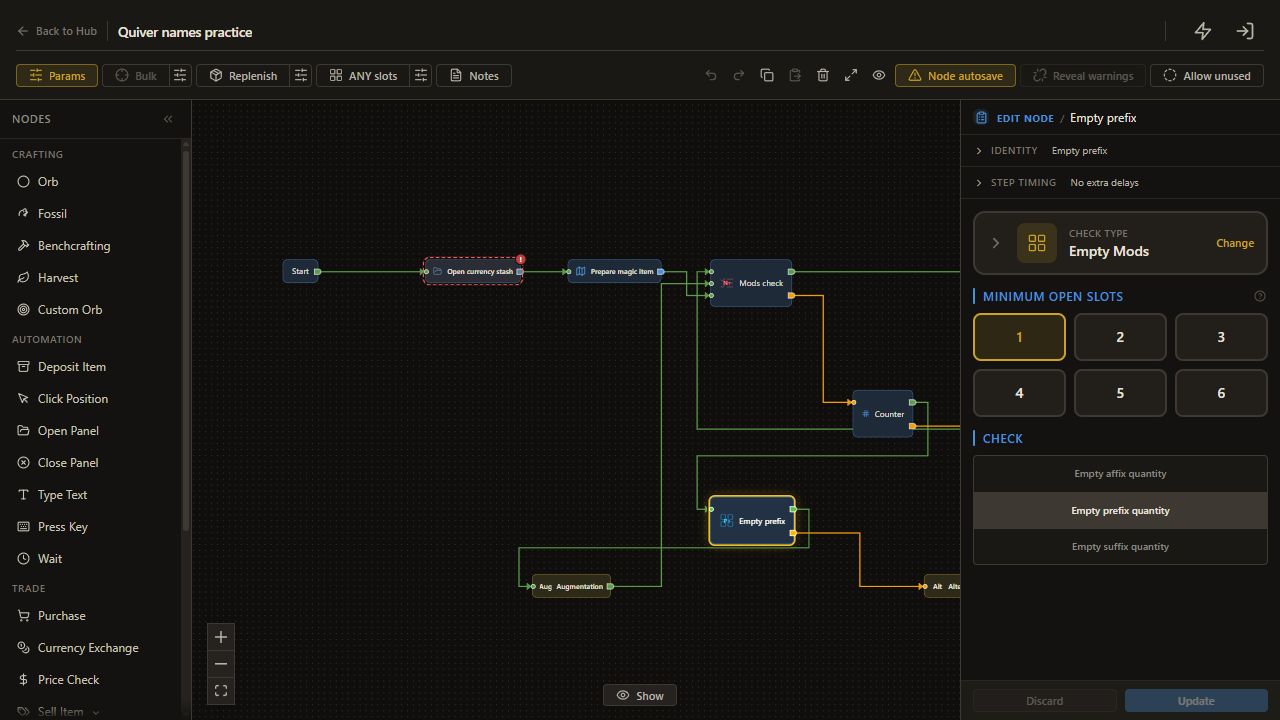
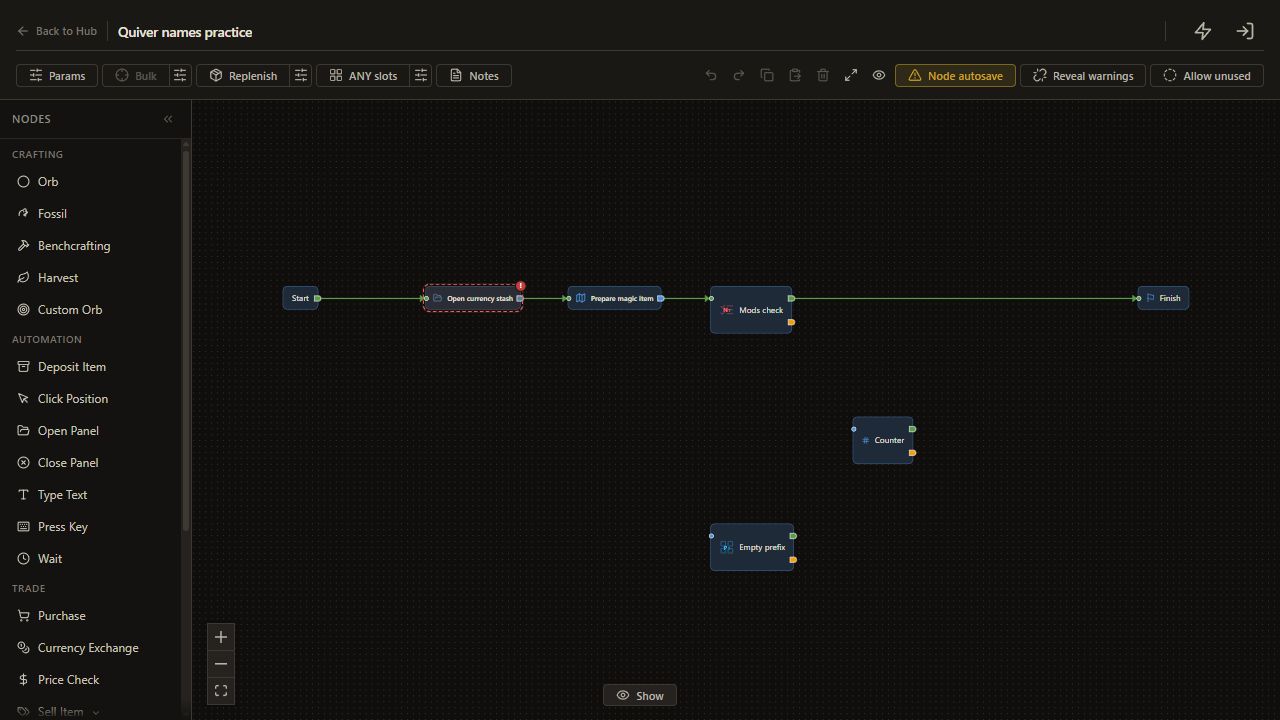
    Read and complete this step before continuing.

  14. 2. Prepare the entry path

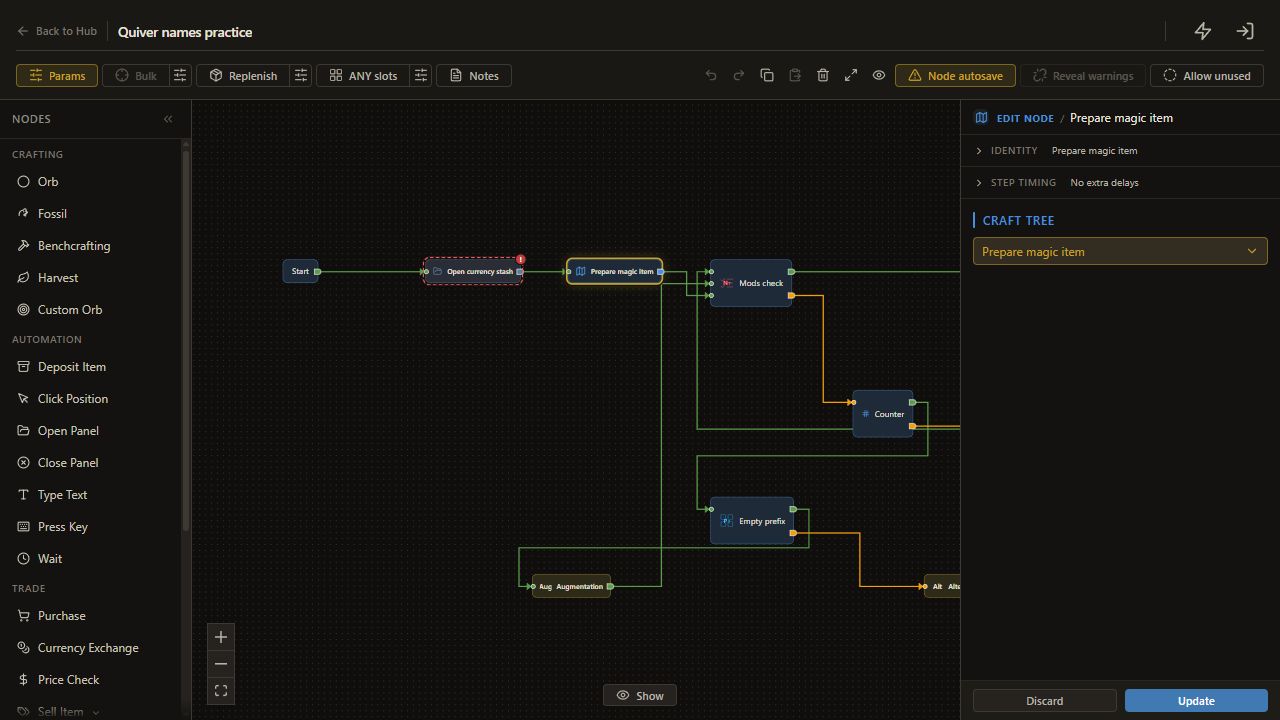
    14. Add Prepare magic item

    Choose Embed Tree.

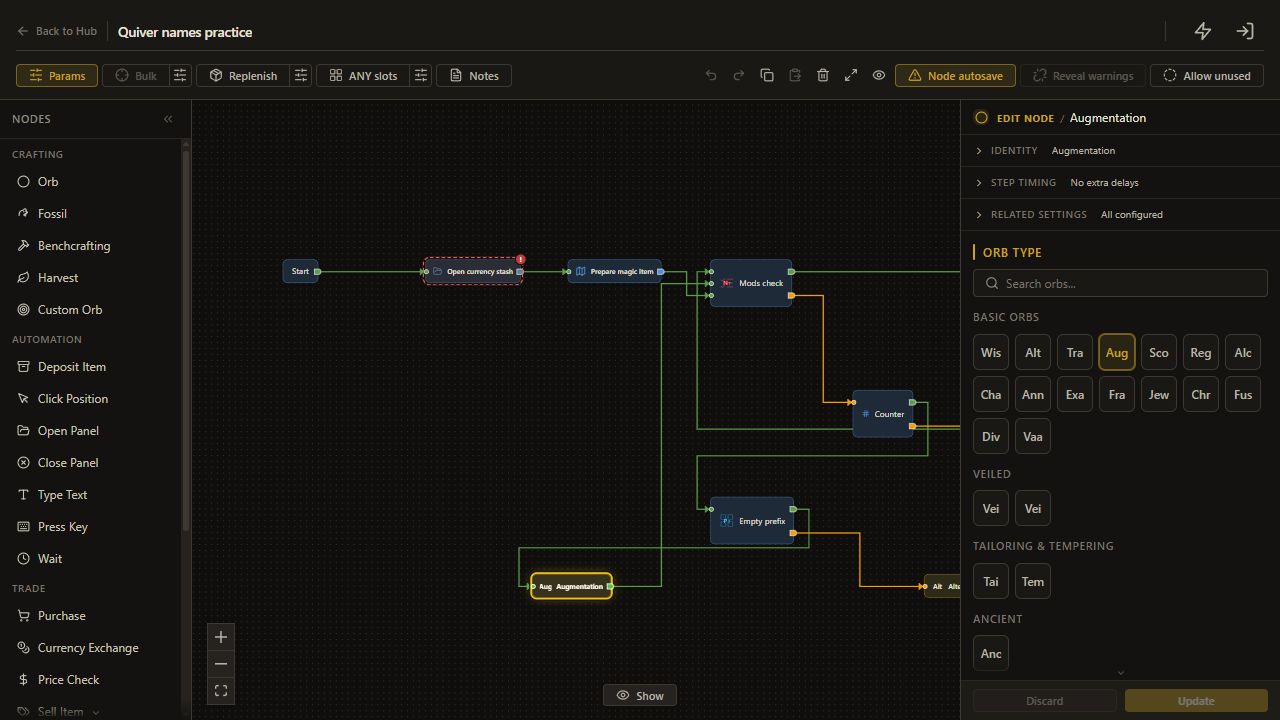
    The node appears on the canvas and its settings open.

    Open full-size screenshot
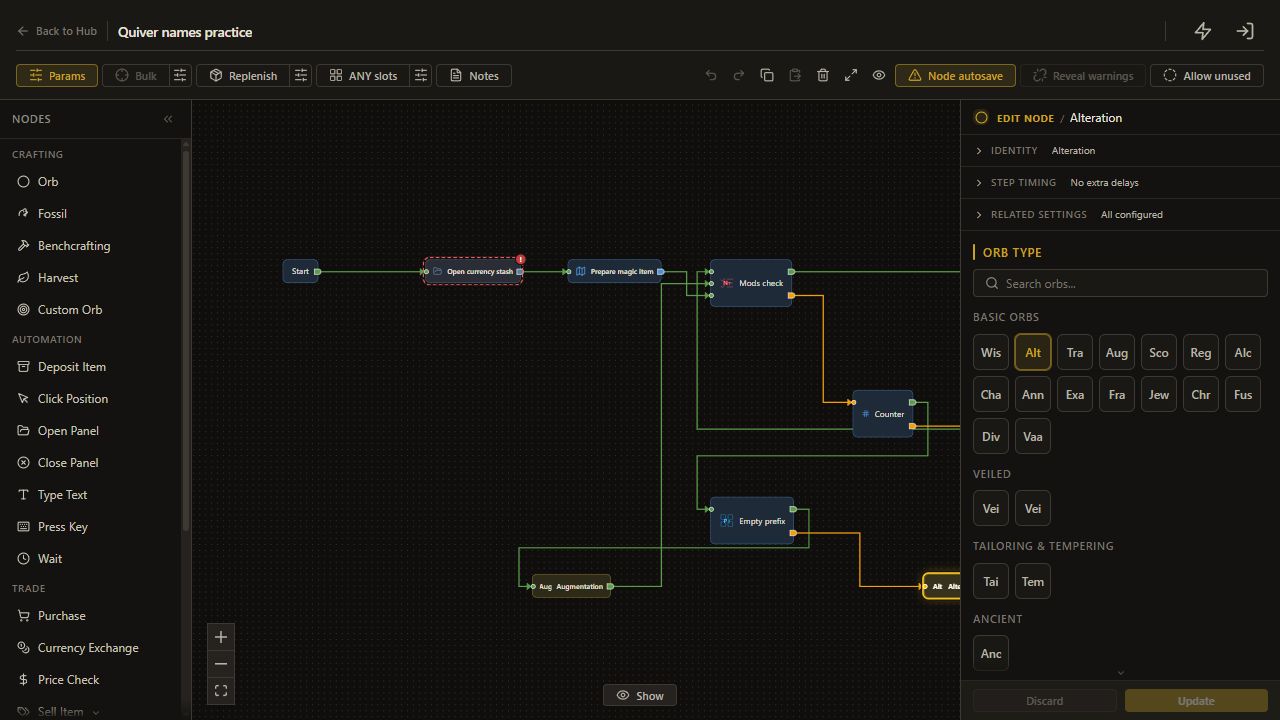
  15. 2. Prepare the entry path

    15. Select the child

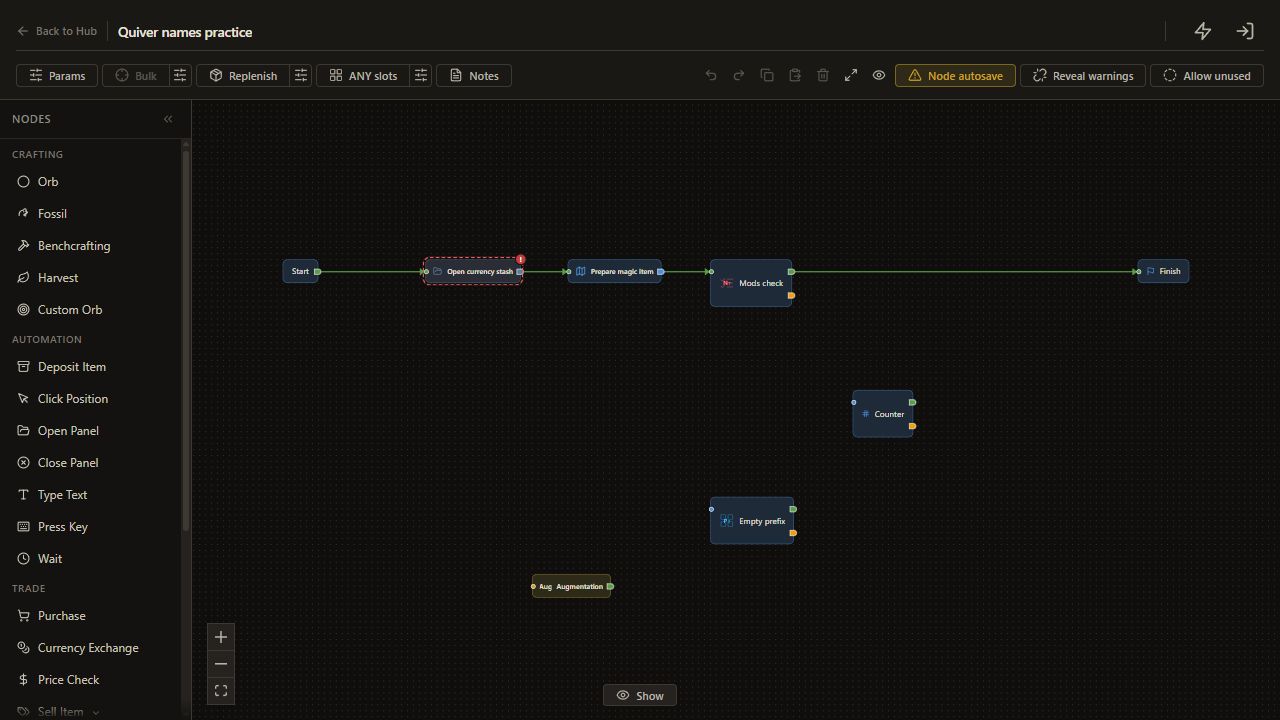
    Set Craft tree to Prepare magic item.

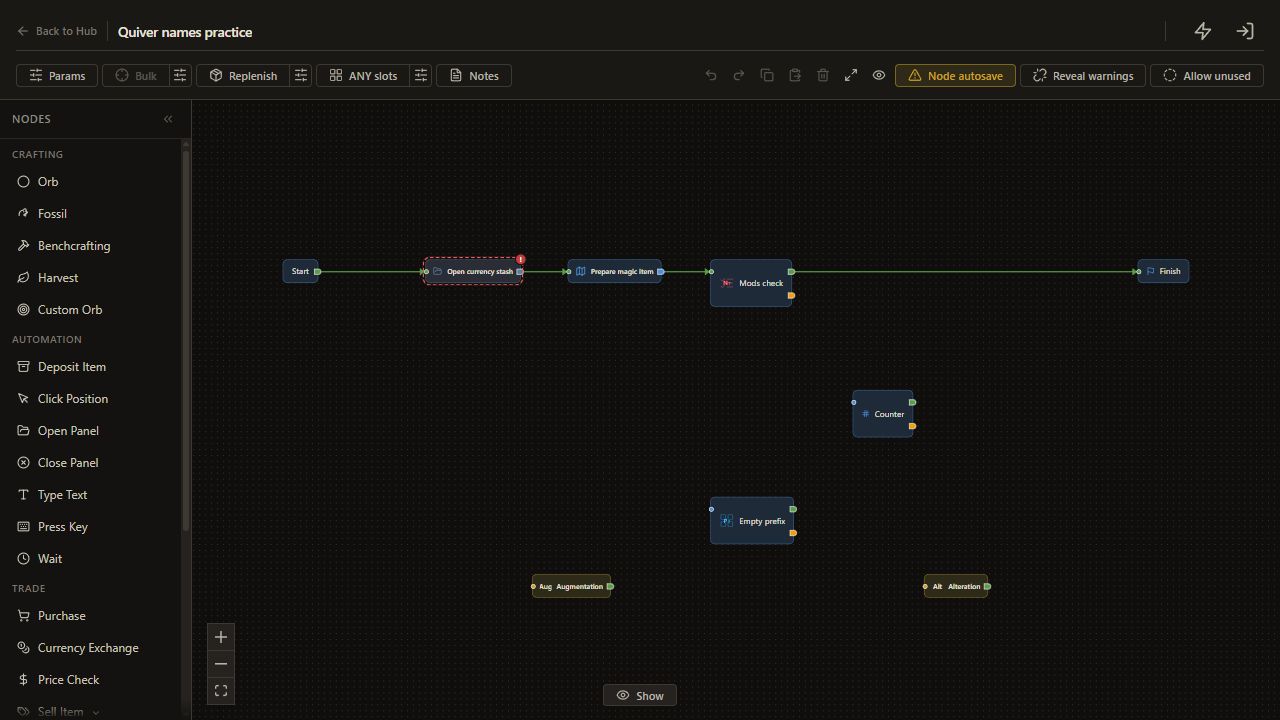
    Craft tree keeps the selected value.

    Open full-size screenshot
  16. 2. Prepare the entry path

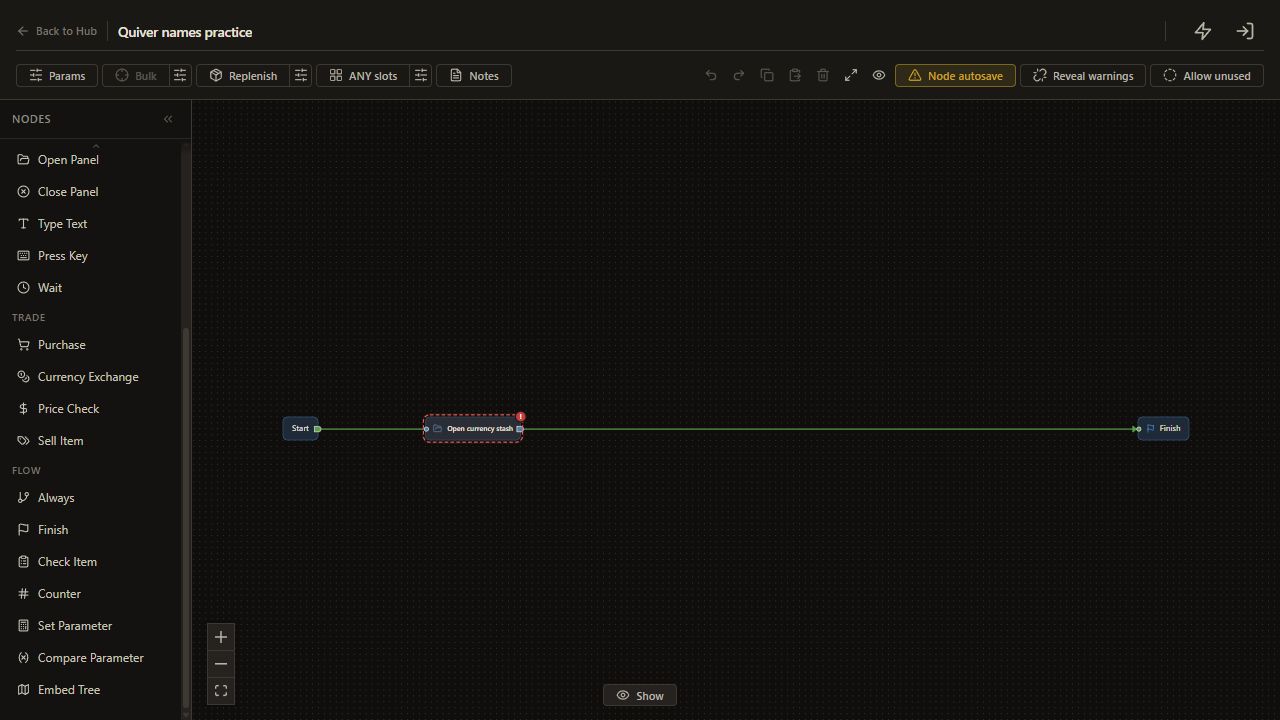
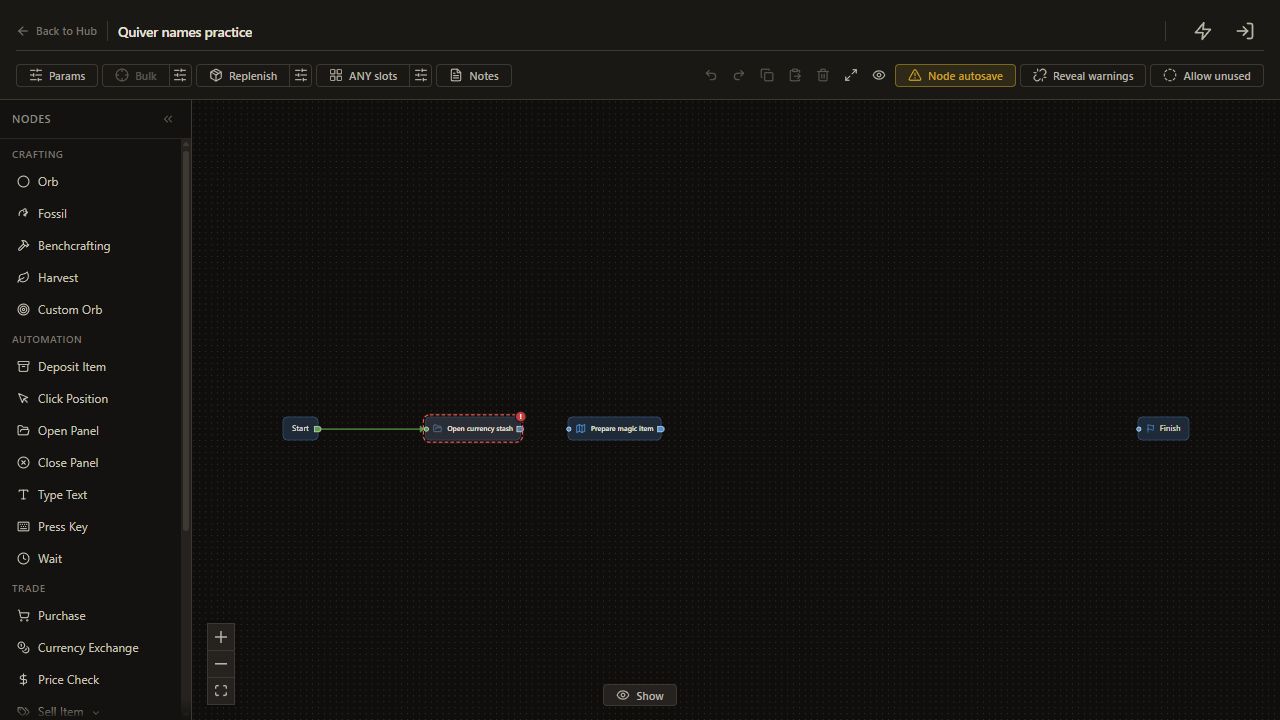
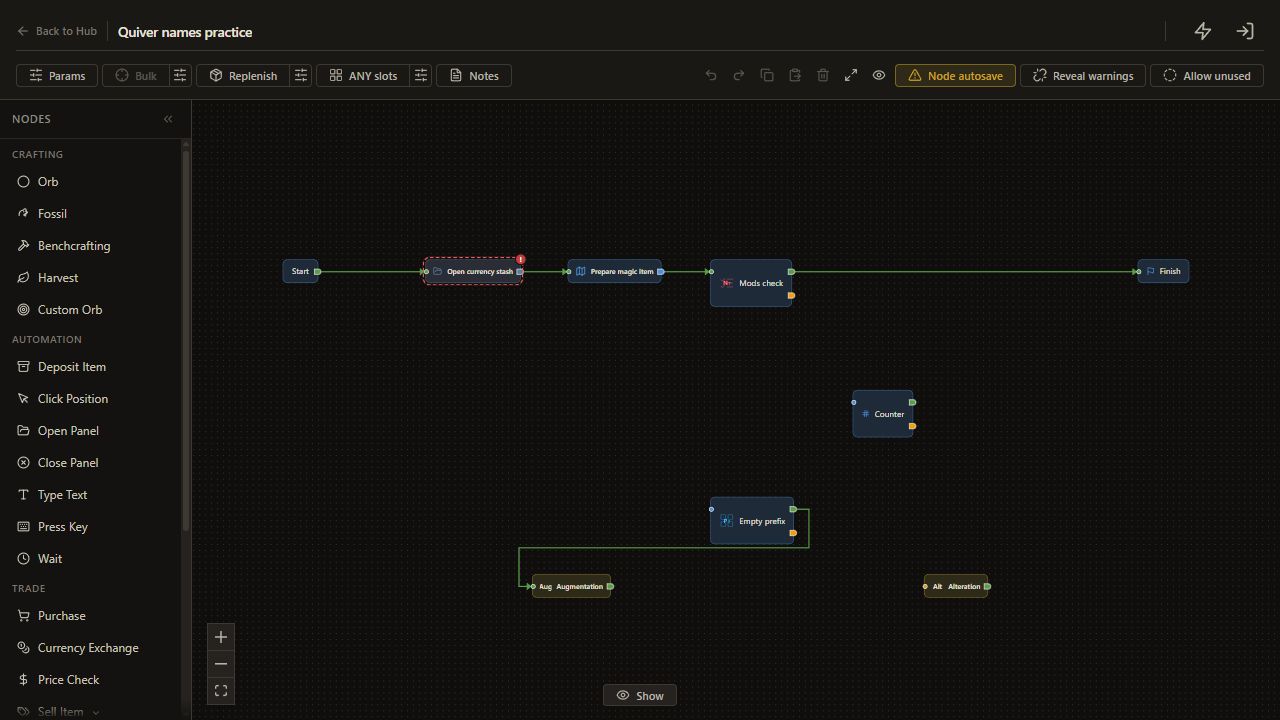
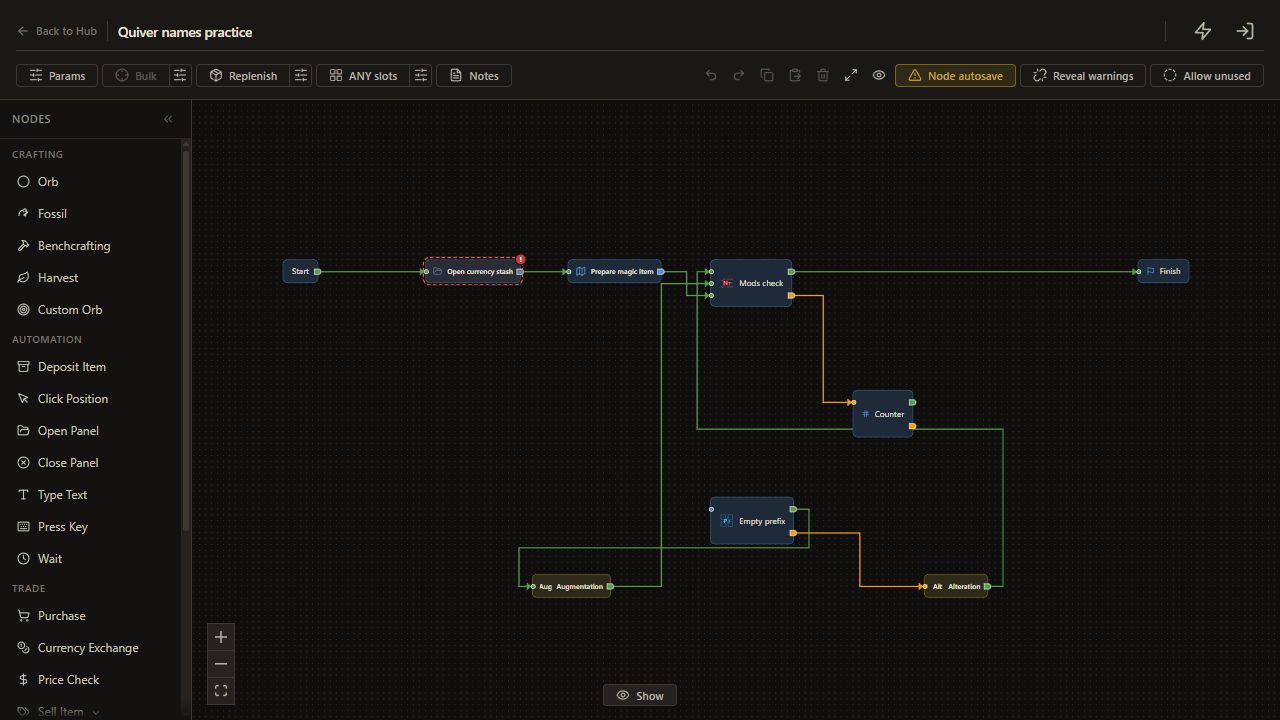
    16. Connect Start output to Open currency stash

    Drag from Start's unnamed output to an input on Open currency stash.

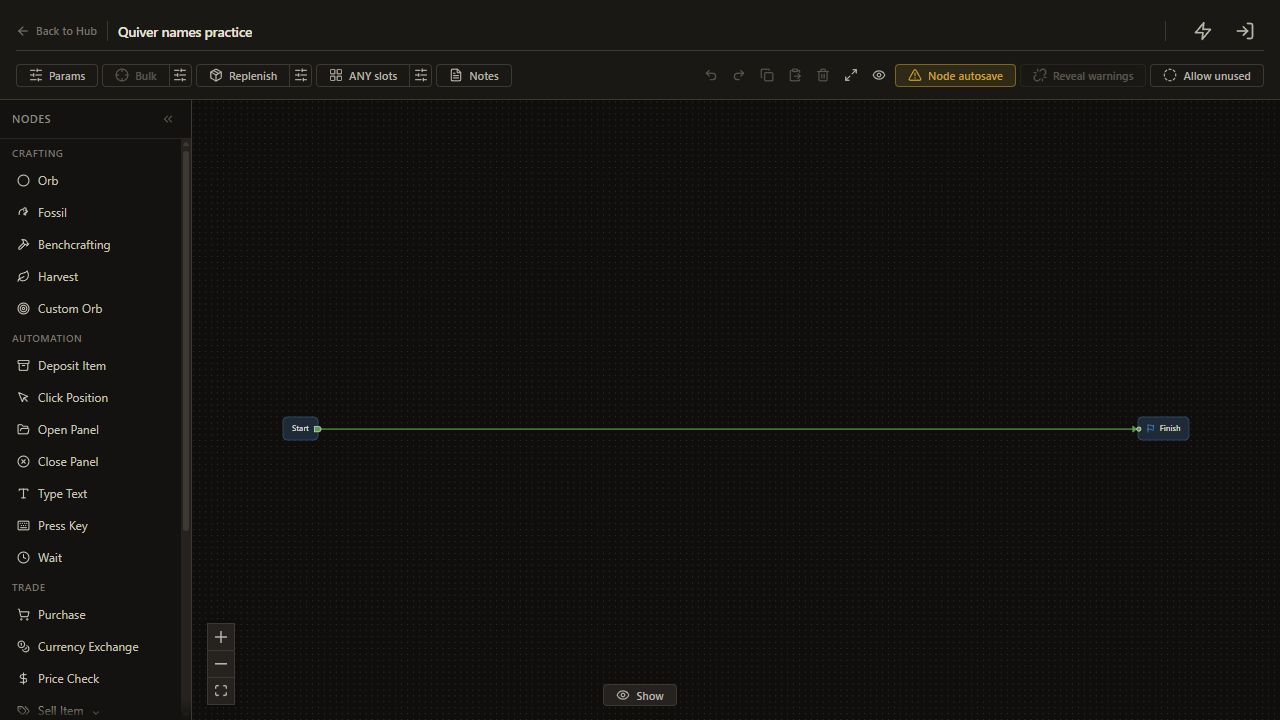
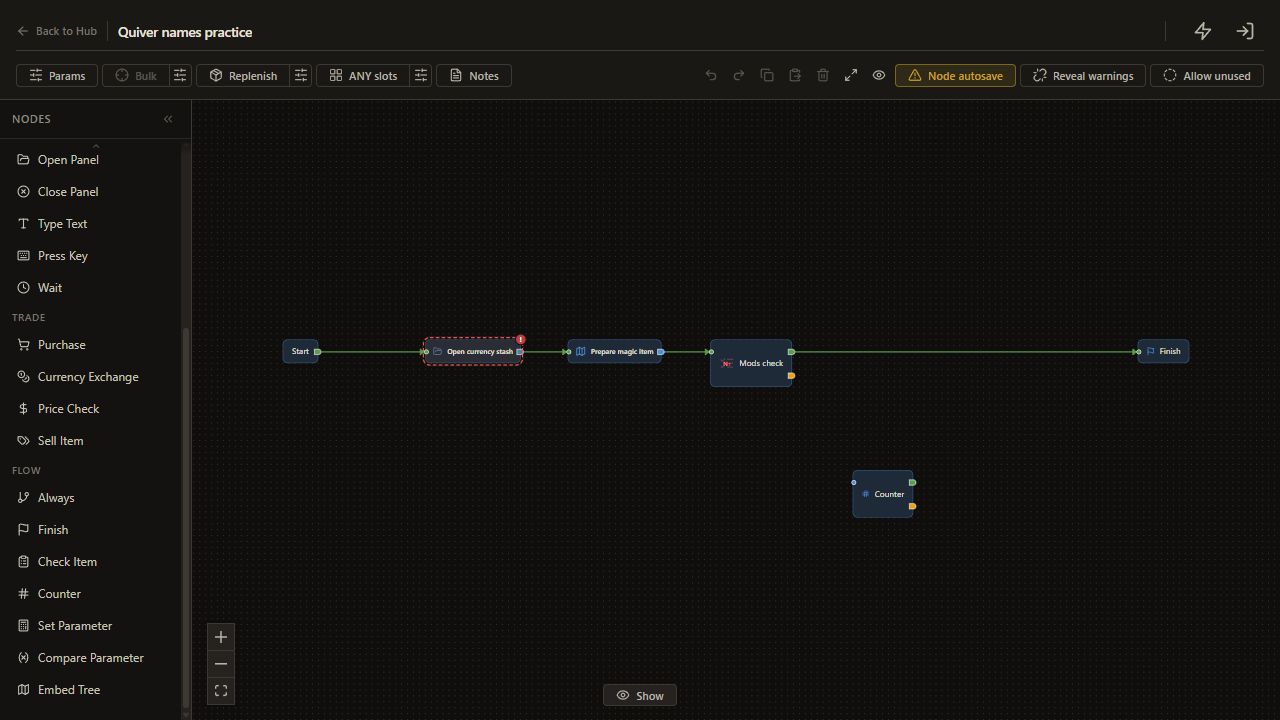
    The next route reaches Open currency stash. The former Start to Finish connection is replaced automatically.

    Open full-size screenshot
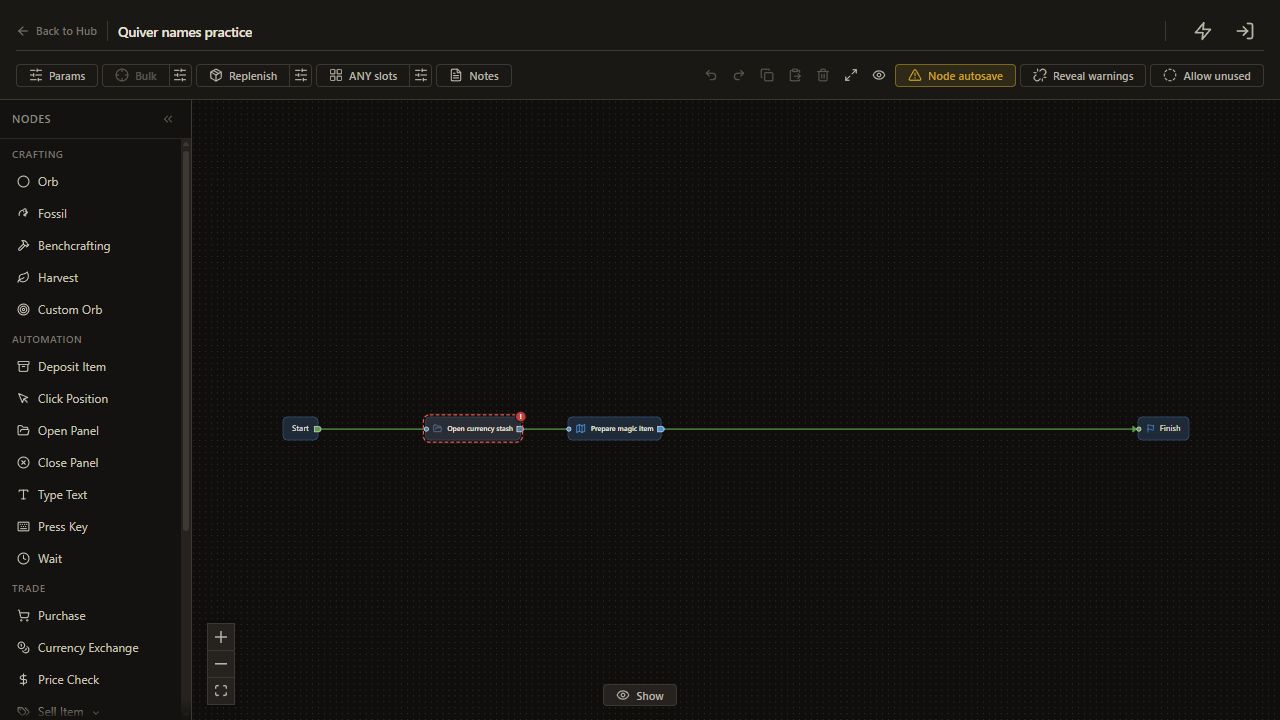
  17. 2. Prepare the entry path

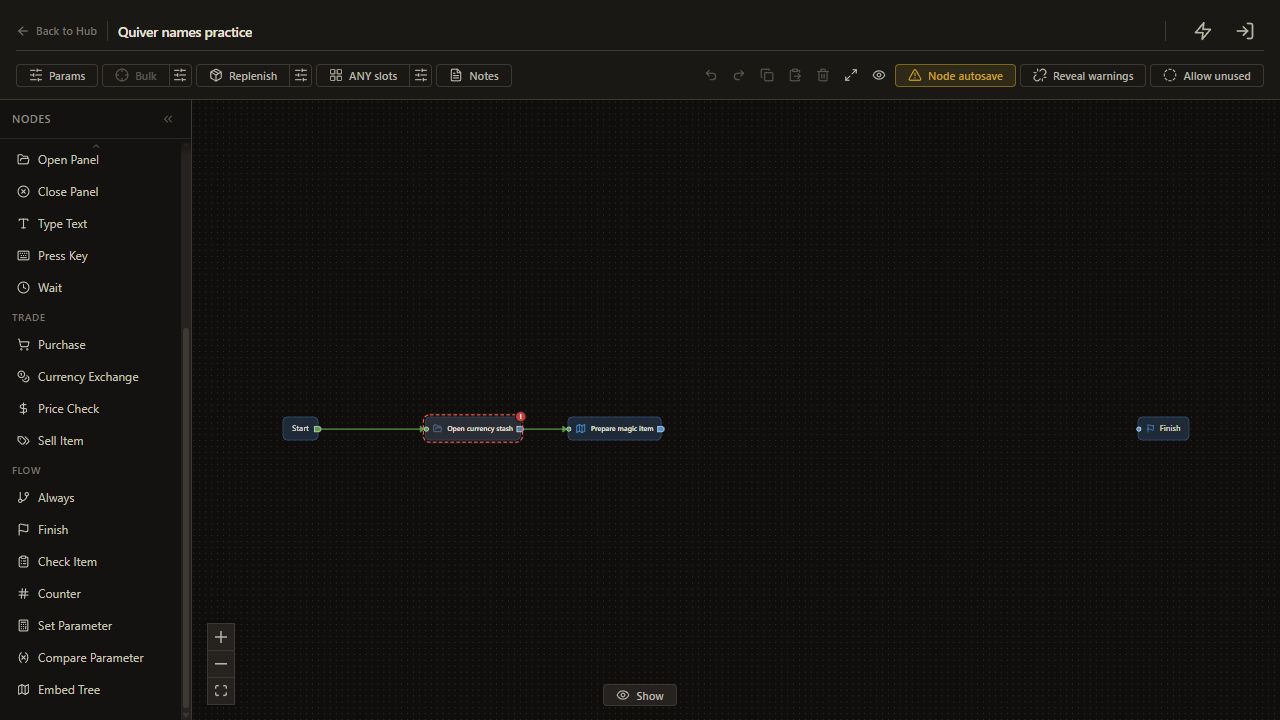
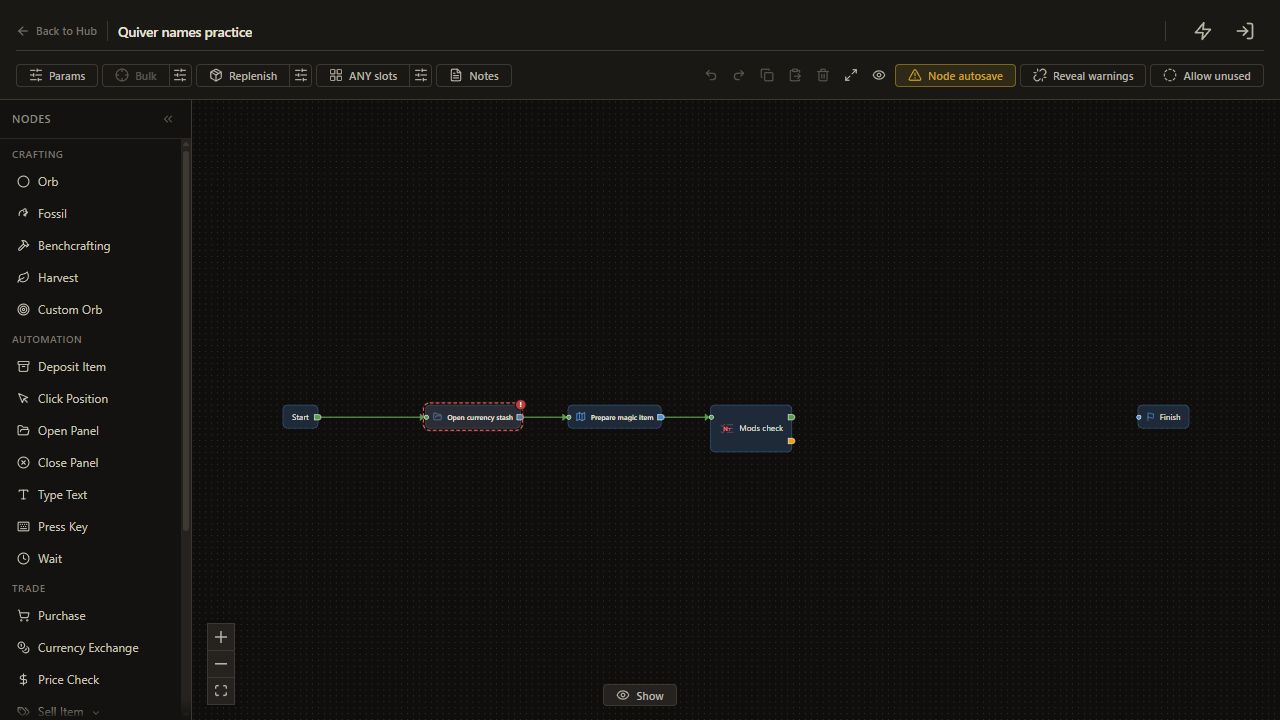
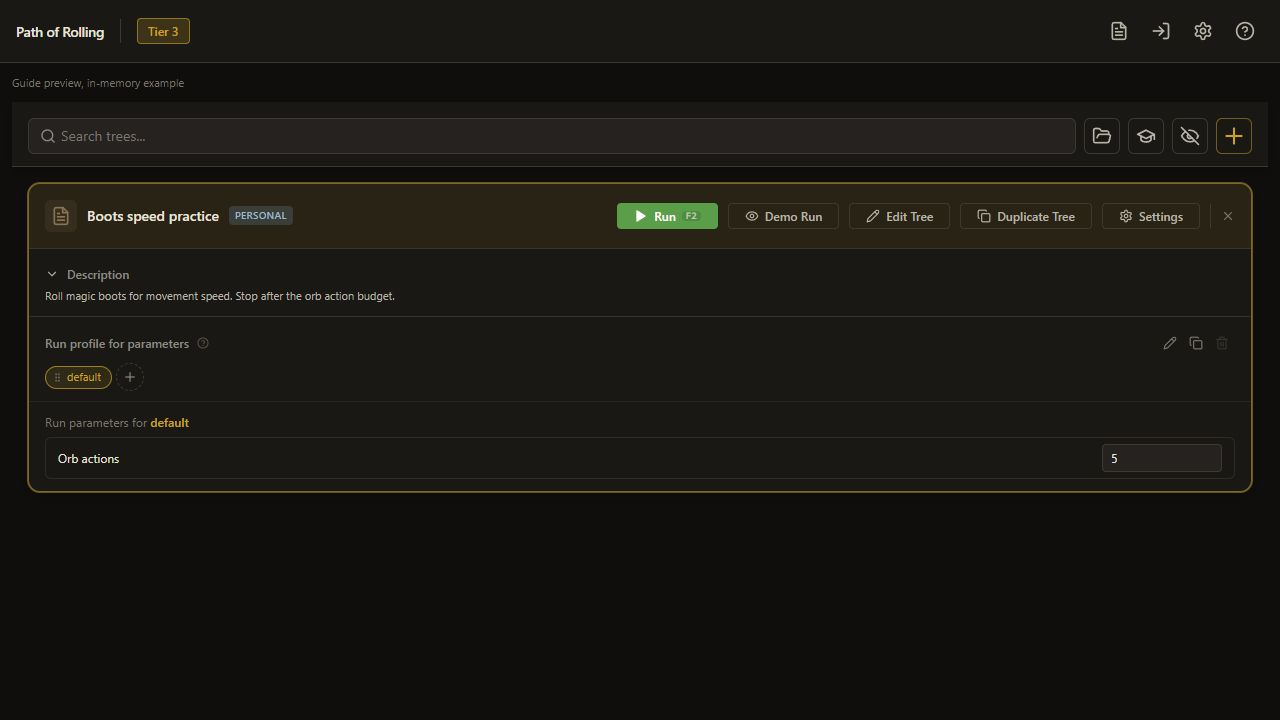
    17. Connect Open currency stash output to Prepare magic item

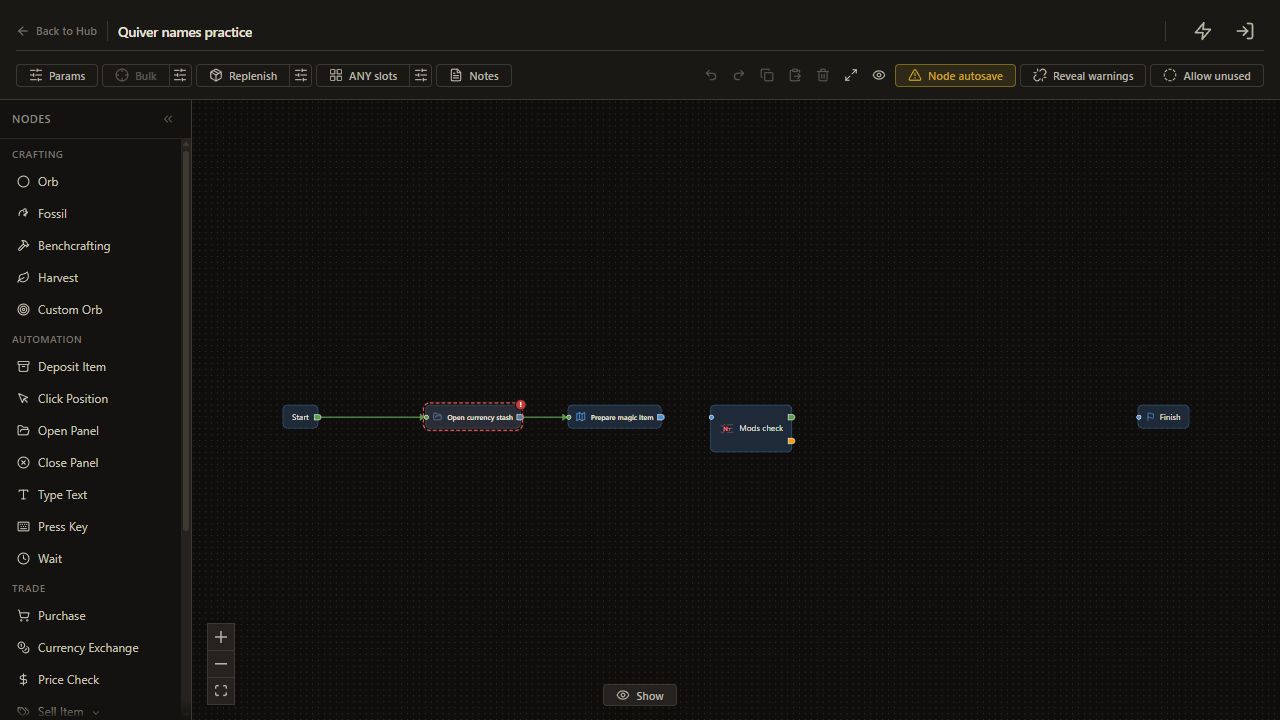
    Drag from Open currency stash's unnamed output to an input on Prepare magic item.

    The next route reaches Prepare magic item.

    Open full-size screenshot
  18. 3. Enter the name list

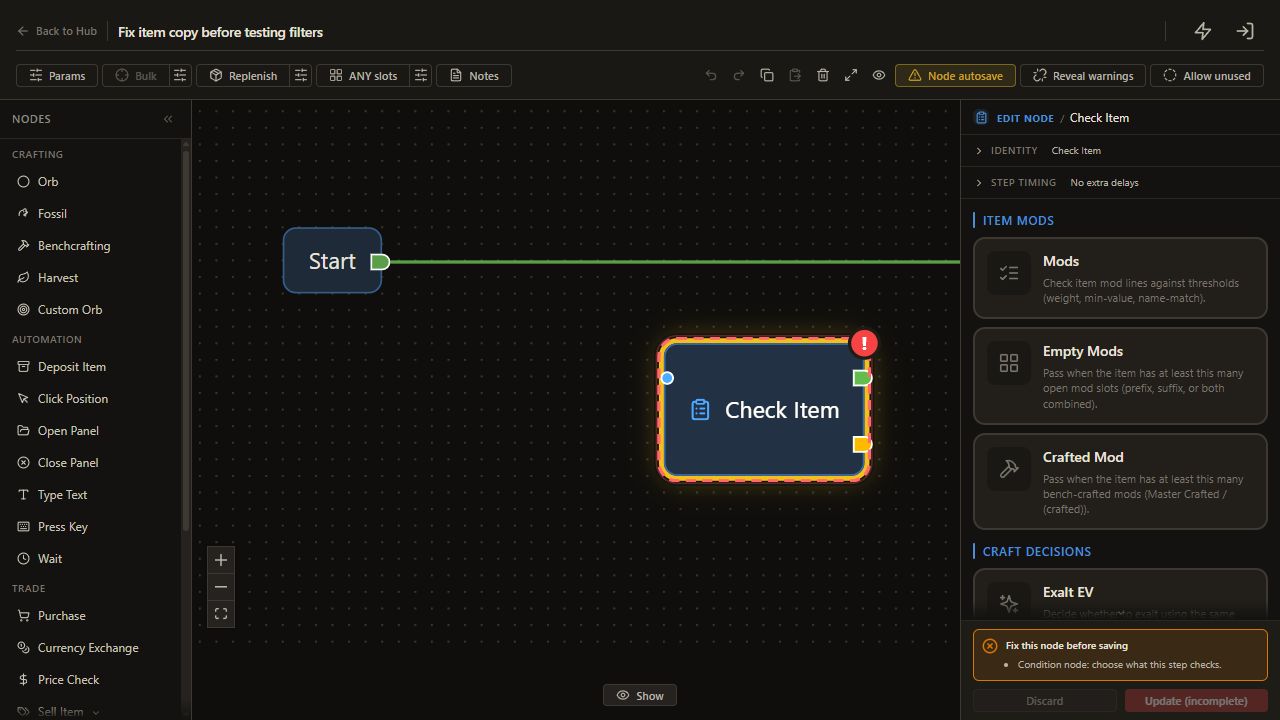
    18. Add Mods check

    Choose Check Item.

    The node appears on the canvas and its settings open.

    Open full-size screenshot
  19. 3. Enter the name list

    19. Choose Mods

    Choose Mods.

    The Check Item template is Mods.

    Open full-size screenshot
  20. 3. Enter the name list

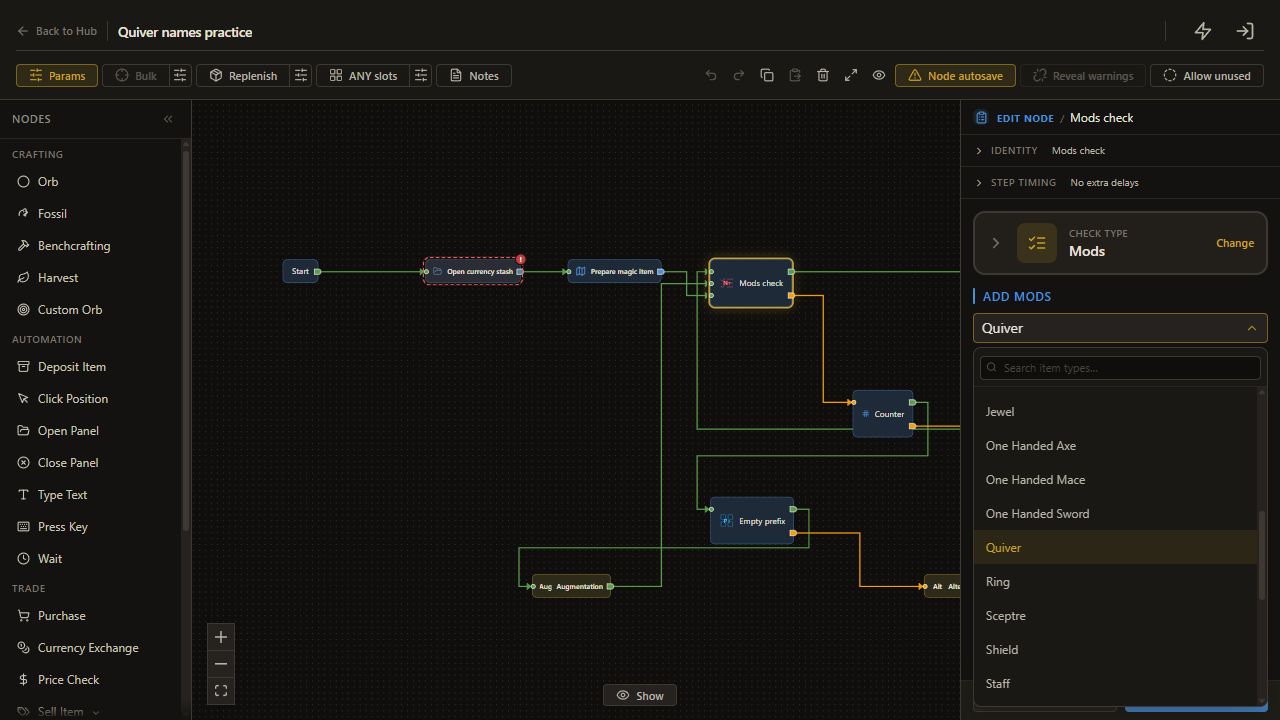
    20. Choose the item scope

    Choose Quiver.

    The quiver catalog opens.

    Open full-size screenshot
  21. 3. Enter the name list

    21. Use named affixes

    Choose Mod names.

    Named rows are available.

    Open full-size screenshot
  22. 3. Enter the name list

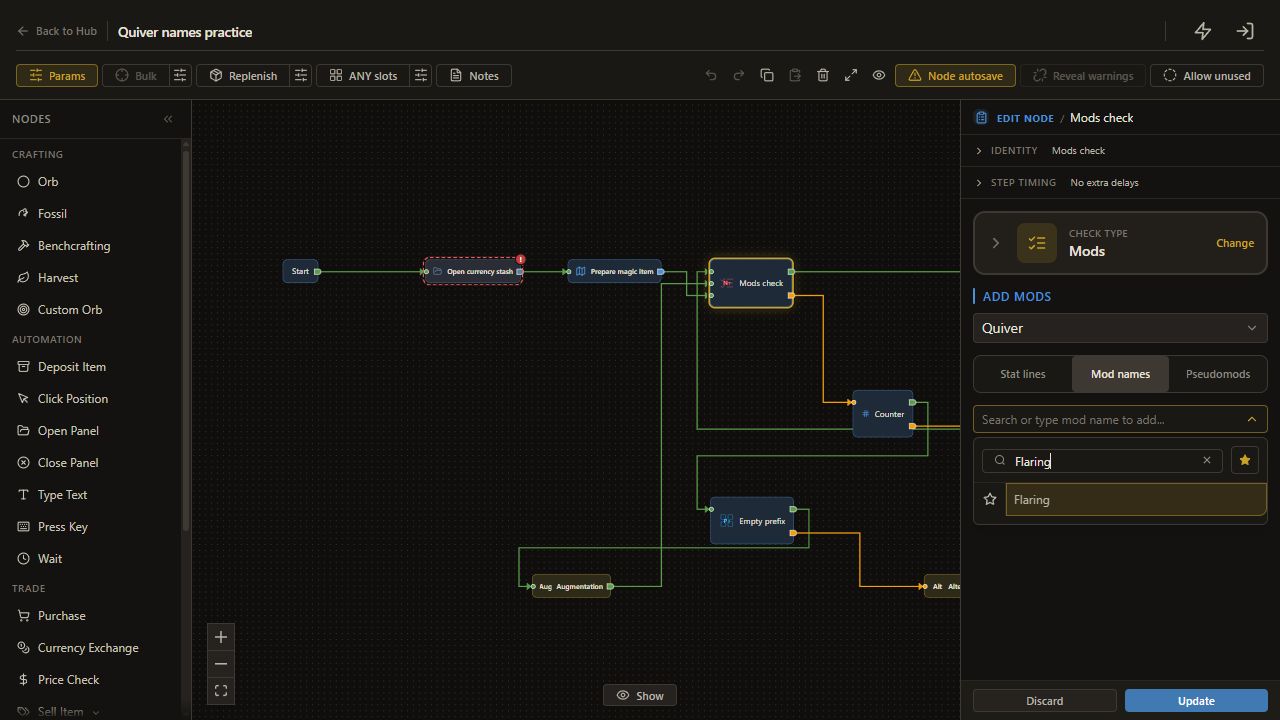
    22. Find Flaring

    Set Search to Flaring.

    Search keeps the selected value.

    Open full-size screenshot
  23. 3. Enter the name list

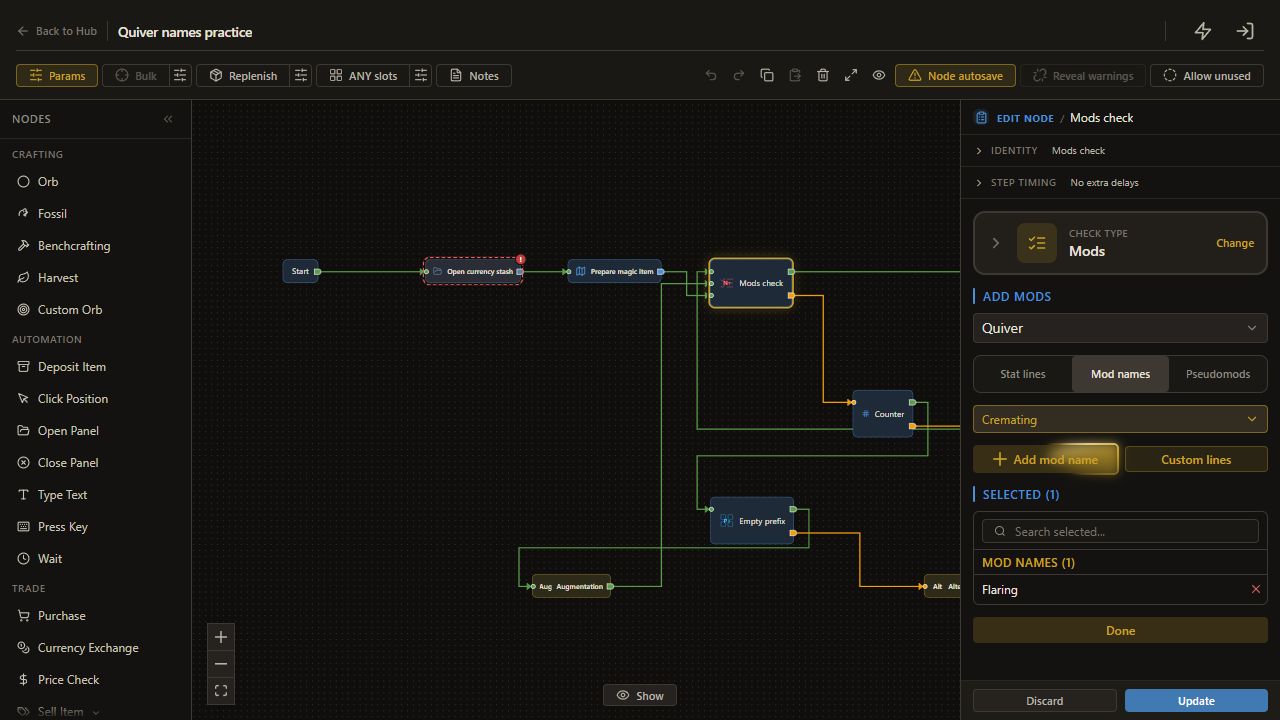
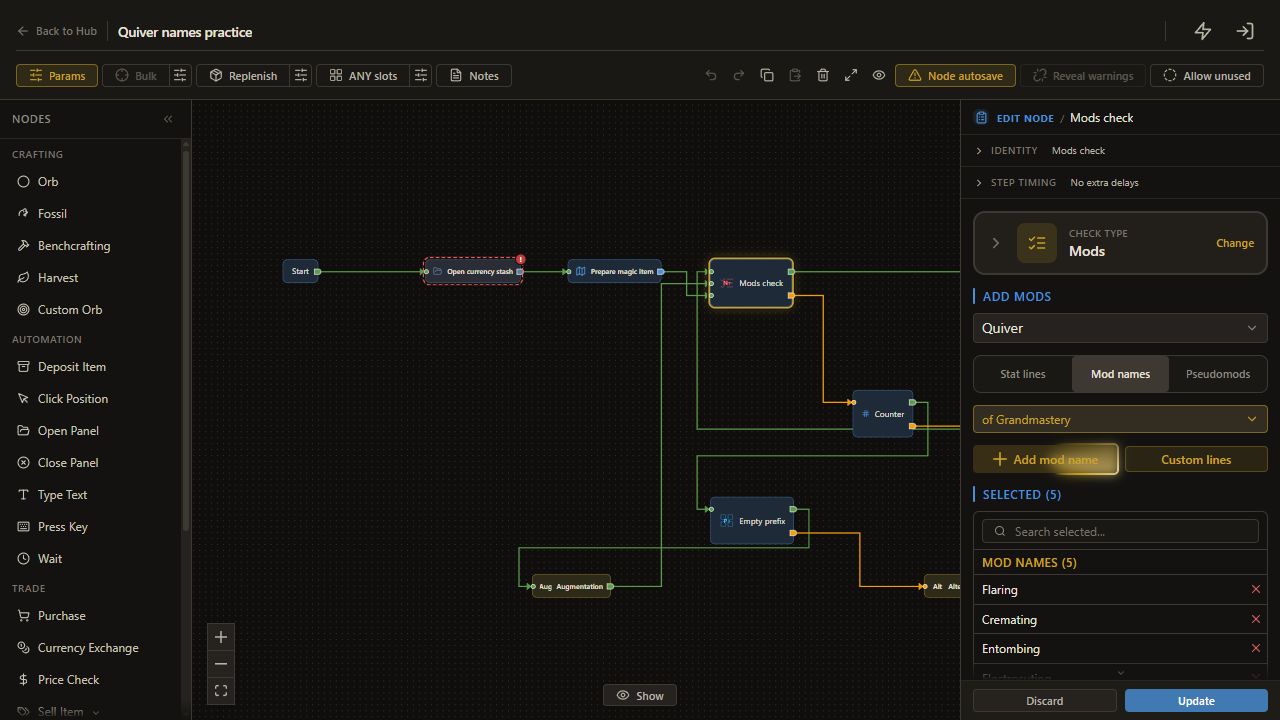
    23. Add Flaring

    Choose Flaring.

    The named row is selected.

    Open full-size screenshot
  24. 3. Enter the name list

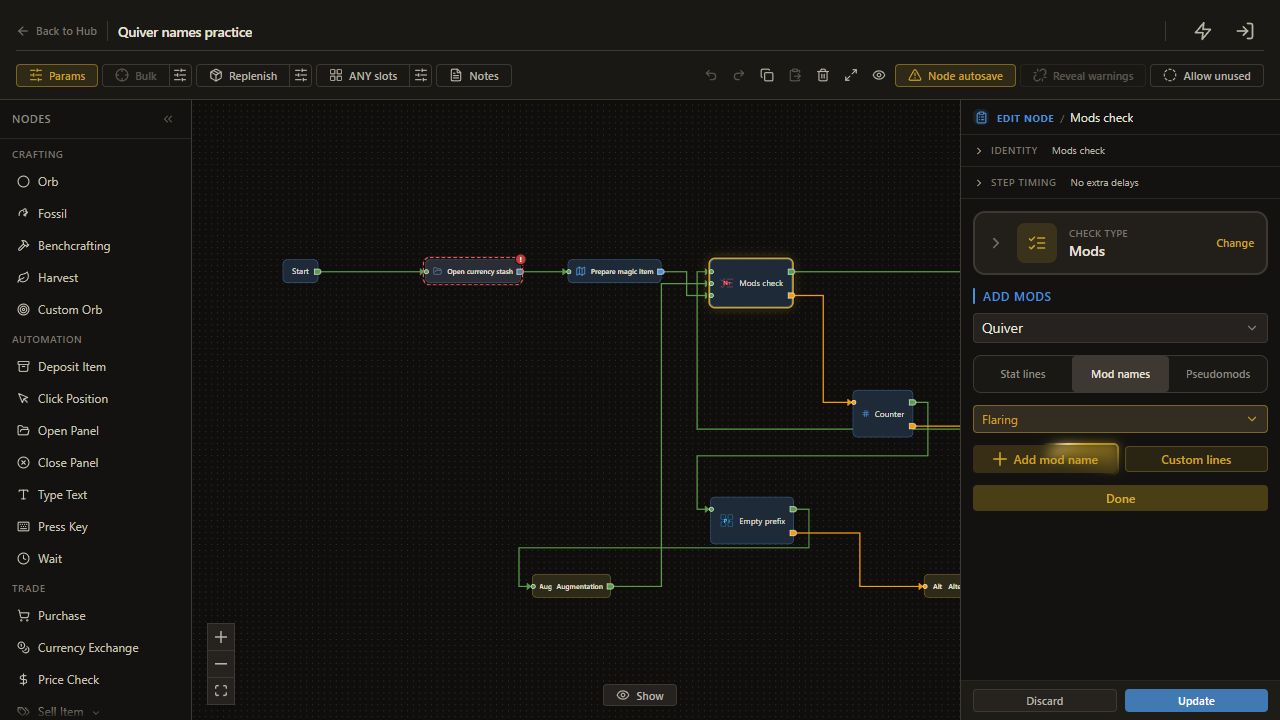
    24. Add Flaring row

    Click Add mod name to add Flaring.

    Flaring is added as row 1.

    Open full-size screenshot
  25. 3. Enter the name list

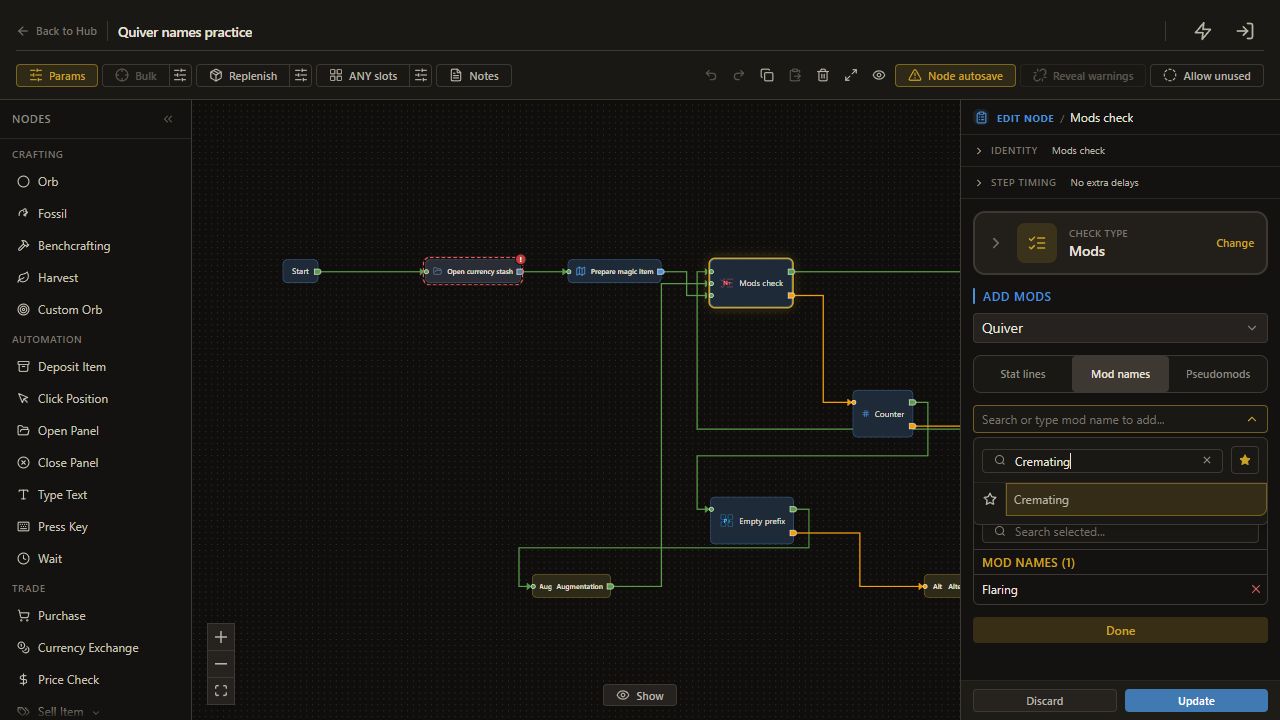
    25. Find Cremating

    Set Search to Cremating.

    Search keeps the selected value.

    Open full-size screenshot
  26. 3. Enter the name list

    26. Add Cremating

    Choose Cremating.

    The named row is selected.

    Open full-size screenshot
  27. 3. Enter the name list

    27. Add Cremating row

    Click Add mod name to add Cremating.

    Cremating is added as row 2.

    Open full-size screenshot
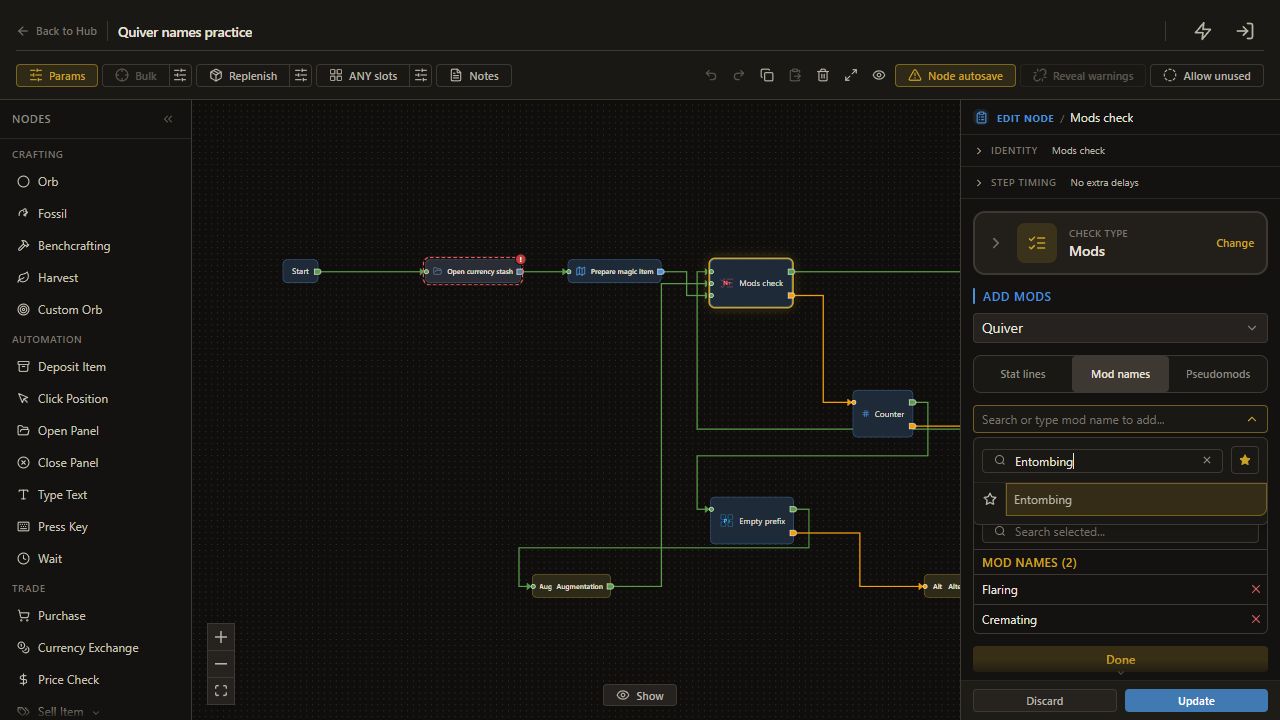
  28. 3. Enter the name list

    28. Find Entombing

    Set Search to Entombing.

    Search keeps the selected value.

    Open full-size screenshot
  29. 3. Enter the name list

    29. Add Entombing

    Choose Entombing.

    The named row is selected.

    Open full-size screenshot
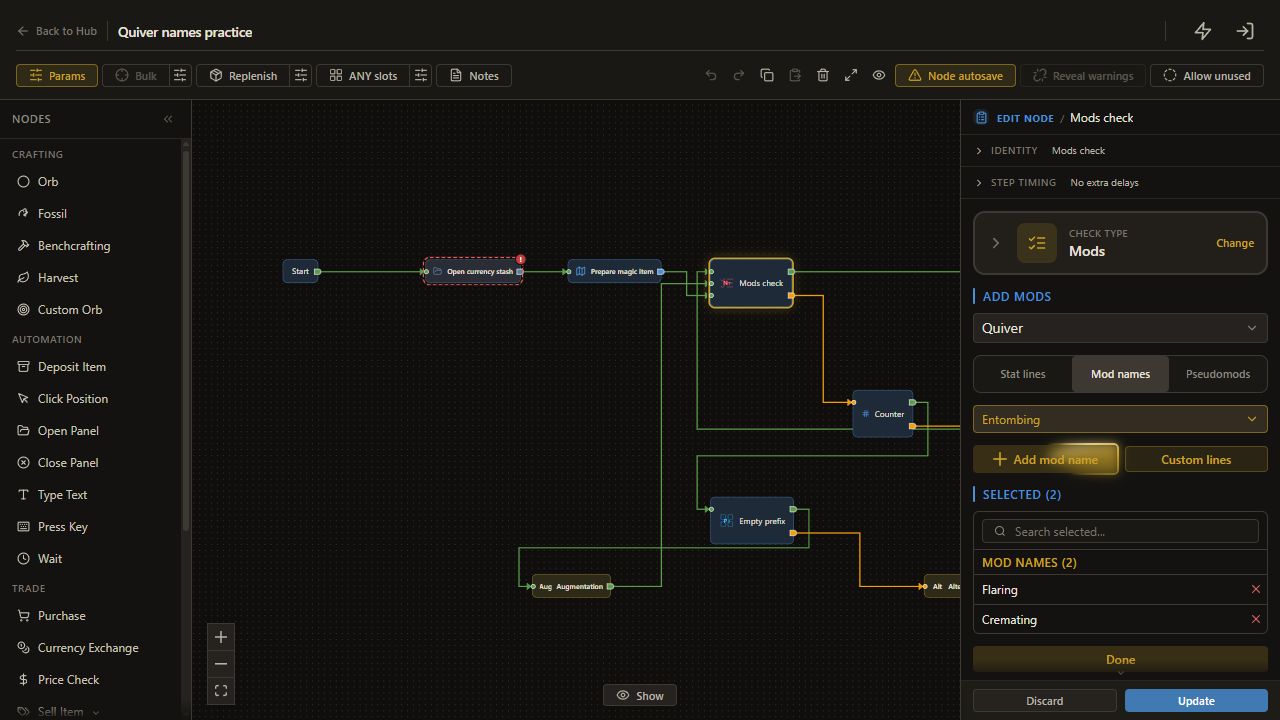
  30. 3. Enter the name list

    30. Add Entombing row

    Click Add mod name to add Entombing.

    Entombing is added as row 3.

    Open full-size screenshot
  31. 3. Enter the name list

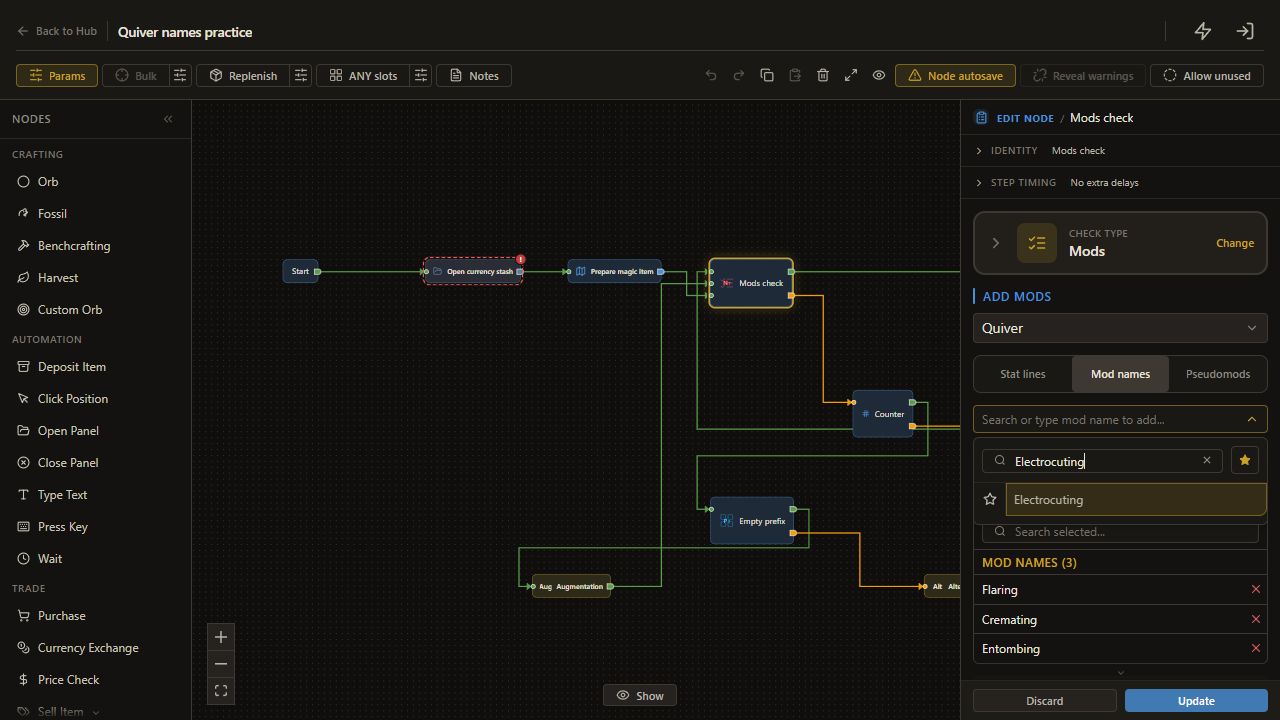
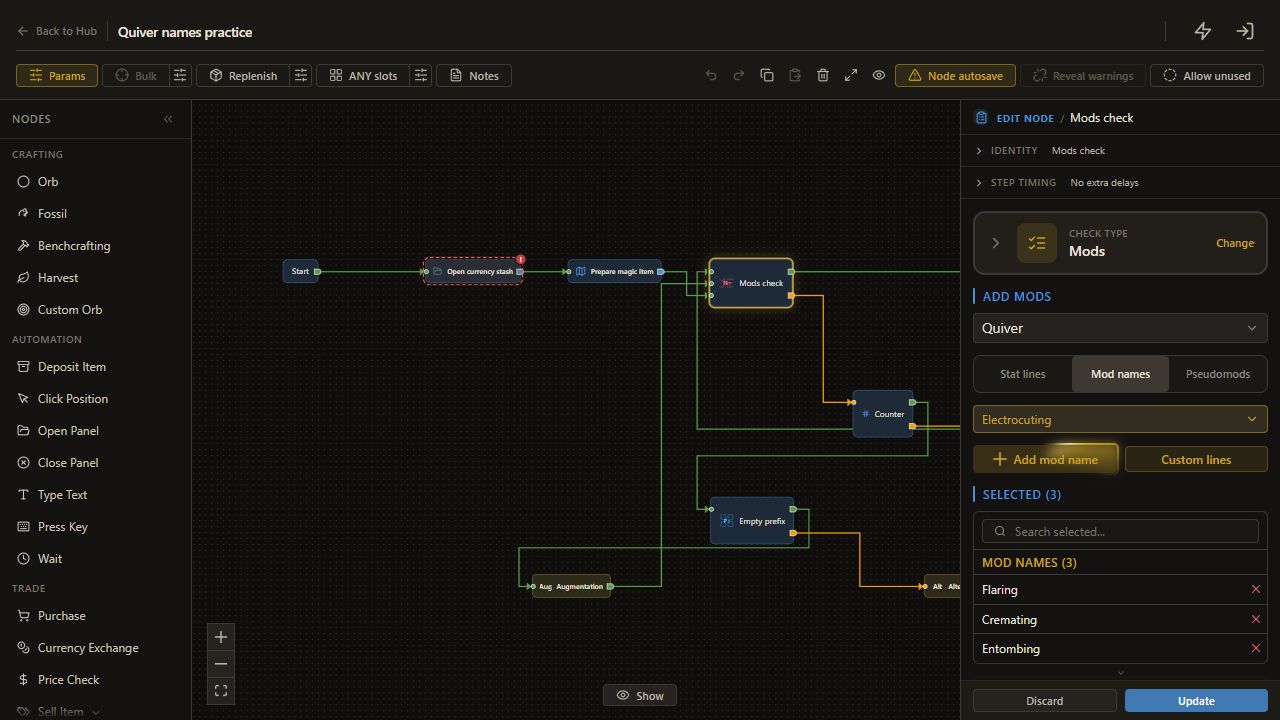
    31. Find Electrocuting

    Set Search to Electrocuting.

    Search keeps the selected value.

    Open full-size screenshot
  32. 3. Enter the name list

    32. Add Electrocuting

    Choose Electrocuting.

    The named row is selected.

    Open full-size screenshot
  33. 3. Enter the name list

    33. Add Electrocuting row

    Click Add mod name to add Electrocuting.

    Electrocuting is added as row 4.

    Open full-size screenshot
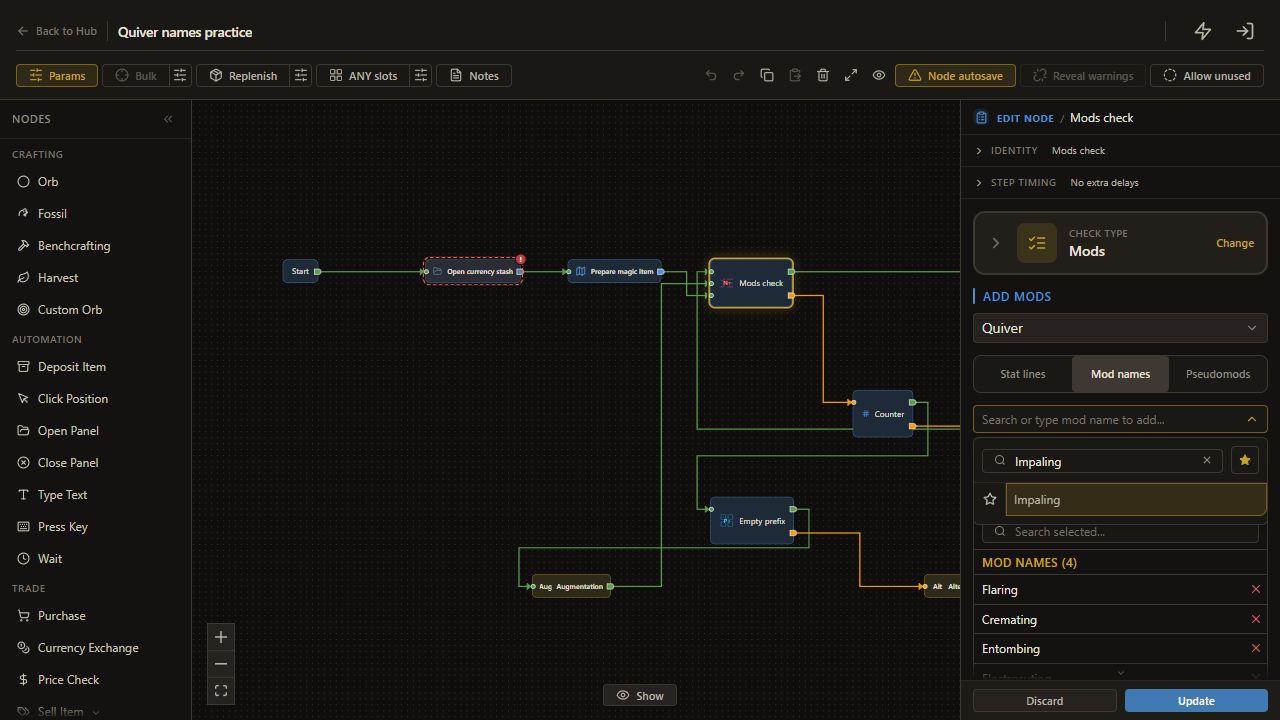
  34. 3. Enter the name list

    34. Find Impaling

    Set Search to Impaling.

    Search keeps the selected value.

    Open full-size screenshot
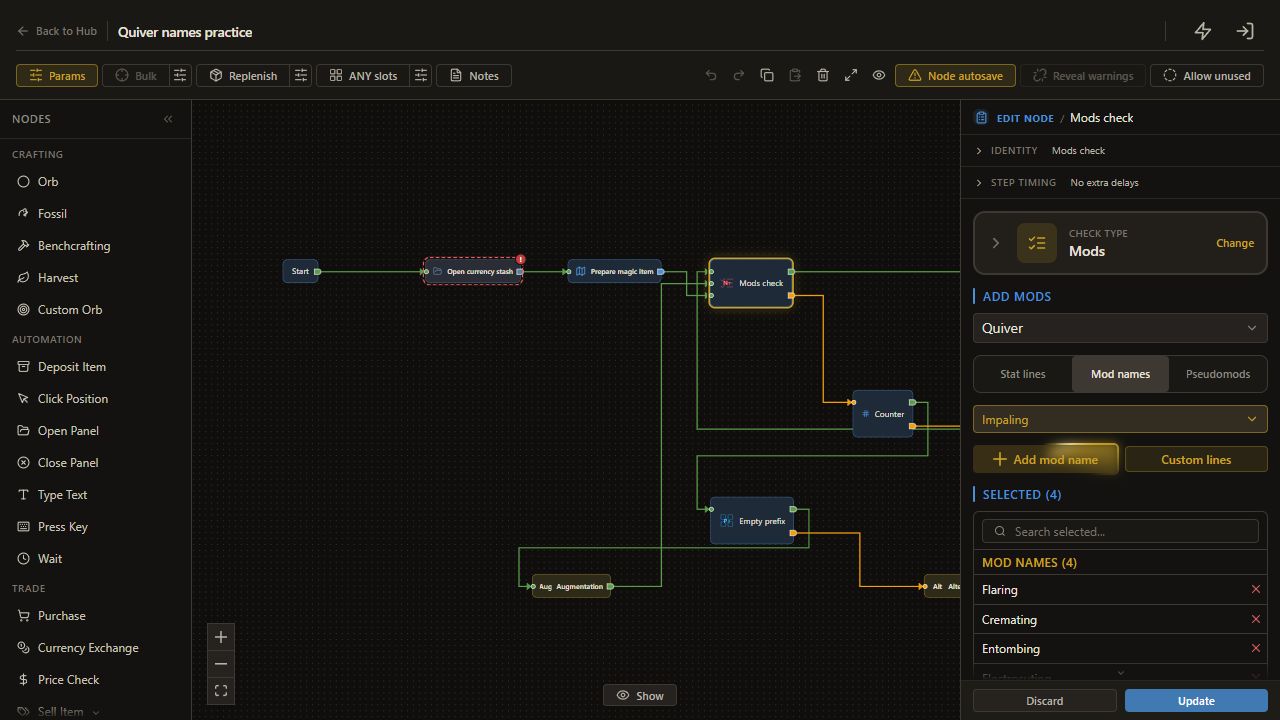
  35. 3. Enter the name list

    35. Add Impaling

    Choose Impaling.

    The named row is selected.

    Open full-size screenshot
  36. 3. Enter the name list

    36. Add Impaling row

    Click Add mod name to add Impaling.

    Impaling is added as row 5.

    Open full-size screenshot
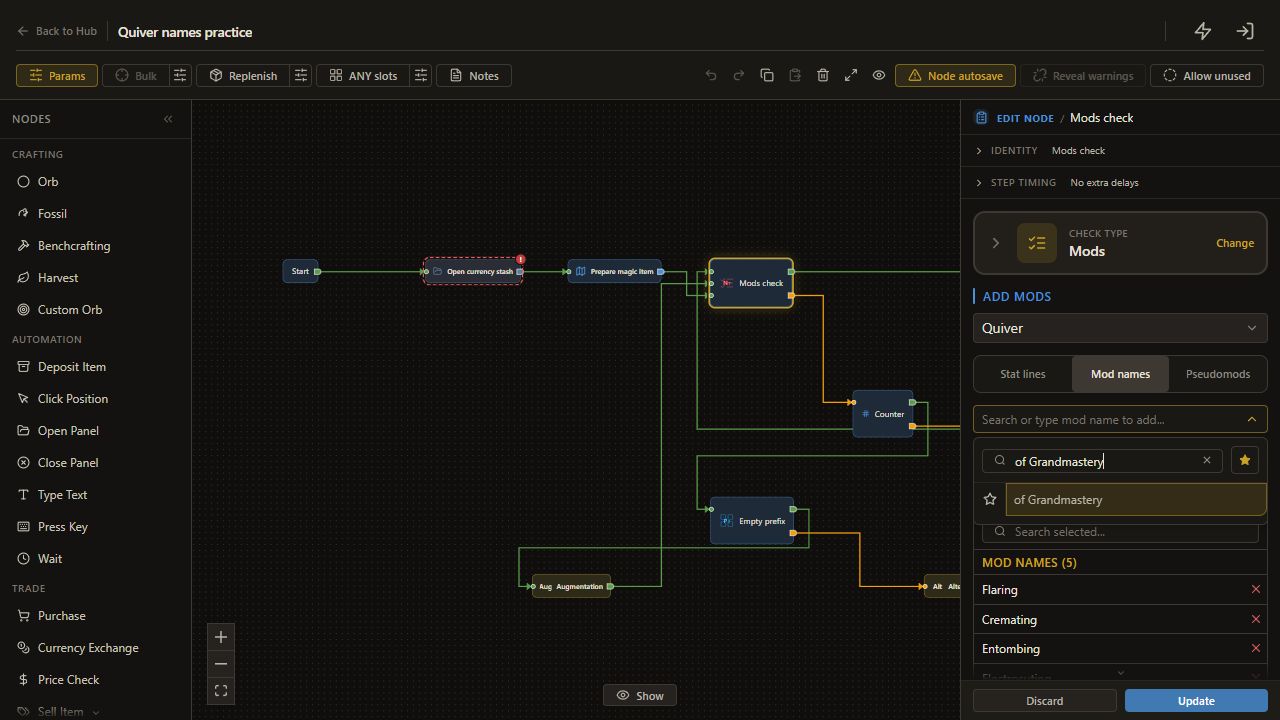
  37. 3. Enter the name list

    37. Find of Grandmastery

    Set Search to of Grandmastery.

    Search keeps the selected value.

    Open full-size screenshot
  38. 3. Enter the name list

    38. Add of Grandmastery

    Choose of Grandmastery.

    The named row is selected.

    Open full-size screenshot
  39. 3. Enter the name list

    39. Add of Grandmastery row

    Click Add mod name to add of Grandmastery.

    of Grandmastery is added as row 6.

    Open full-size screenshot
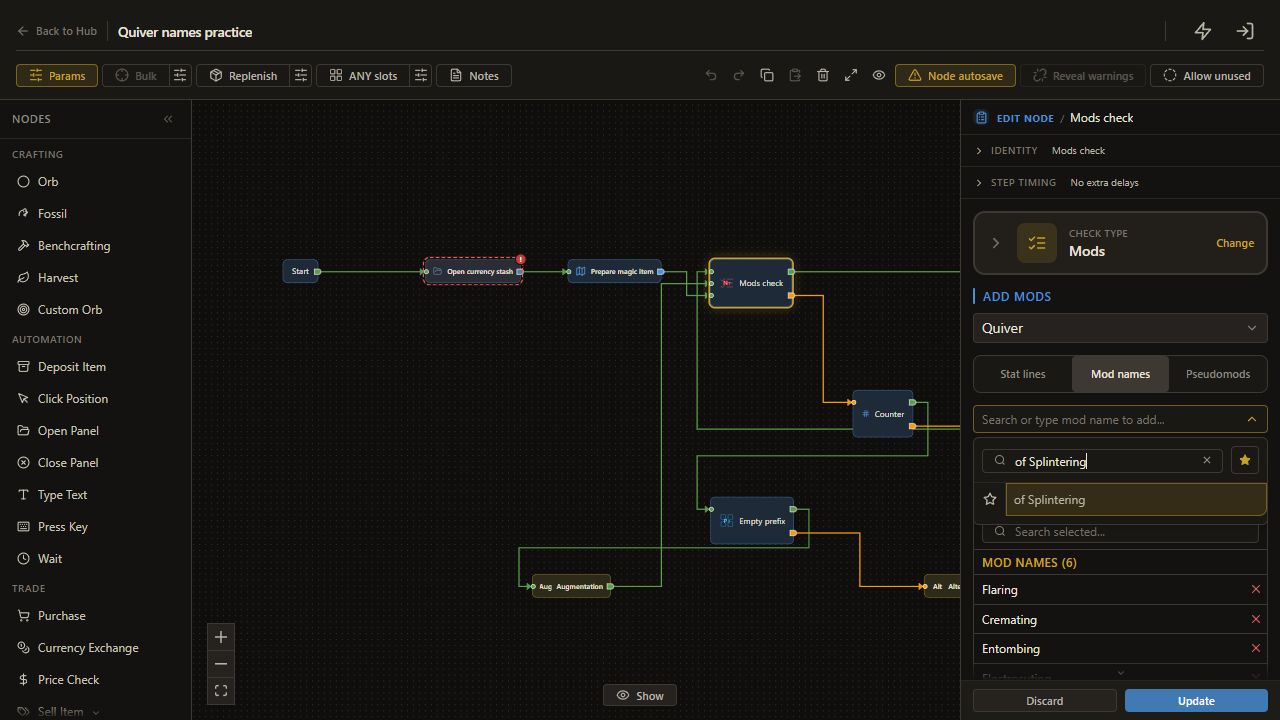
  40. 3. Enter the name list

    40. Find of Splintering

    Set Search to of Splintering.

    Search keeps the selected value.

    Open full-size screenshot
  41. 3. Enter the name list

    41. Add of Splintering

    Choose of Splintering.

    The named row is selected.

    Open full-size screenshot
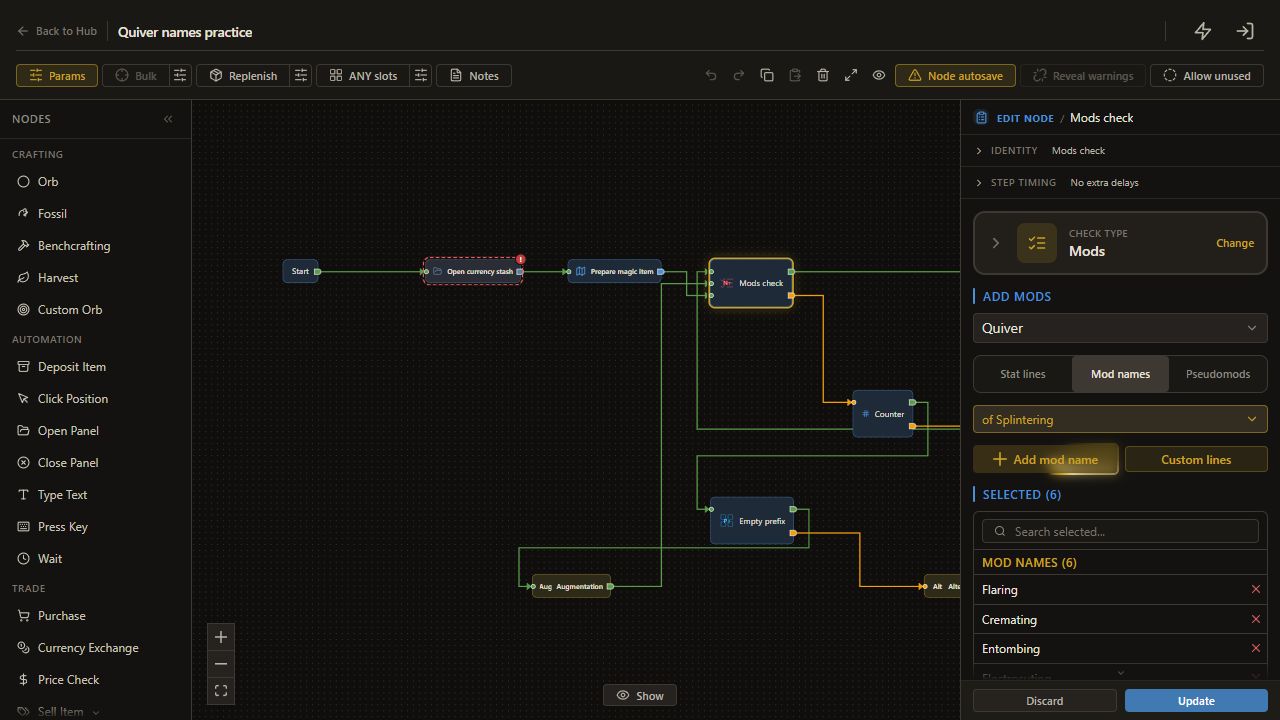
  42. 3. Enter the name list

    42. Add of Splintering row

    Click Add mod name to add of Splintering.

    of Splintering is added as row 7.

    Open full-size screenshot
  43. 3. Enter the name list

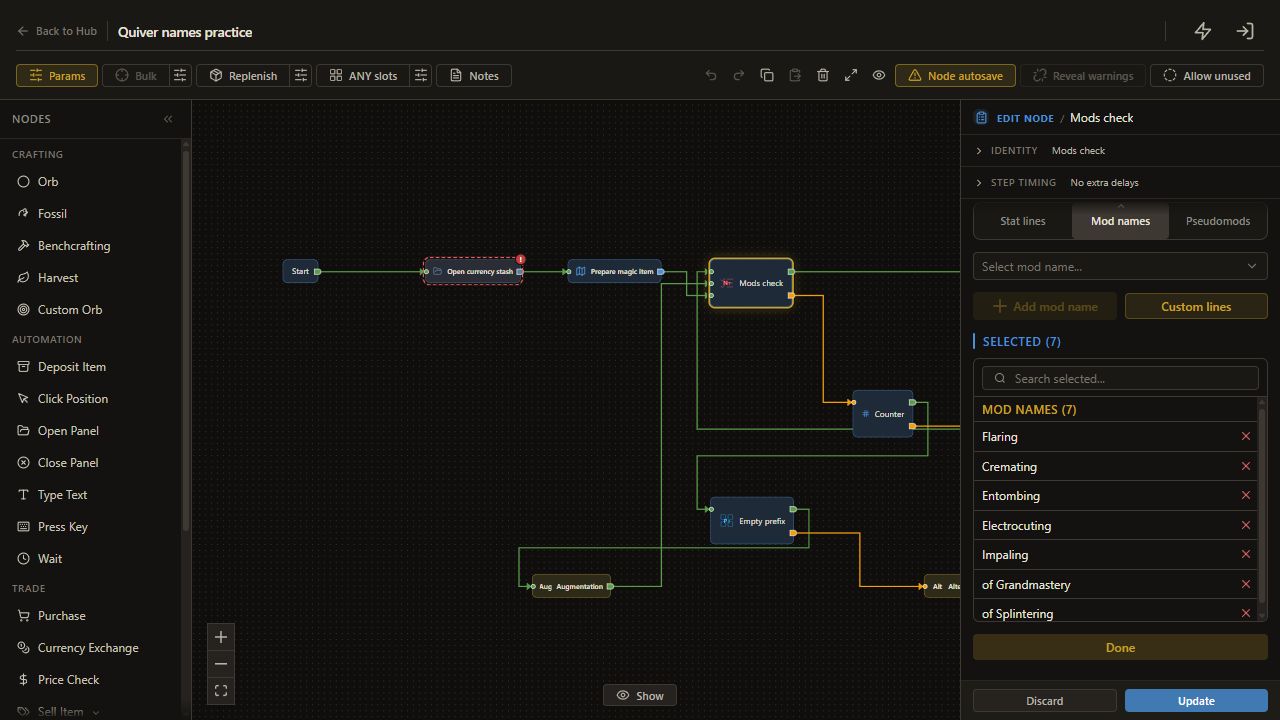
    43. Confirm names

    Choose Done.

    The retained rows appear.

    Open full-size screenshot
  44. 3. Enter the name list

    44. Review rollability

    Retain only intended names available for this scope; independently verify the chosen base can roll them.

    The list is deliberate and makes no value claim.

    Read and complete this step before continuing.

  45. 4. Make matching rows contribute

    45. Use Advanced mode

    Choose Advanced.

    Contributions and thresholds appear.

    Open full-size screenshot
  46. 4. Make matching rows contribute

    46. Disable automatic syncing

    Set Keep Required matches equal to mod count to False.

    Keep Required matches equal to mod count keeps the selected value.

    Open full-size screenshot
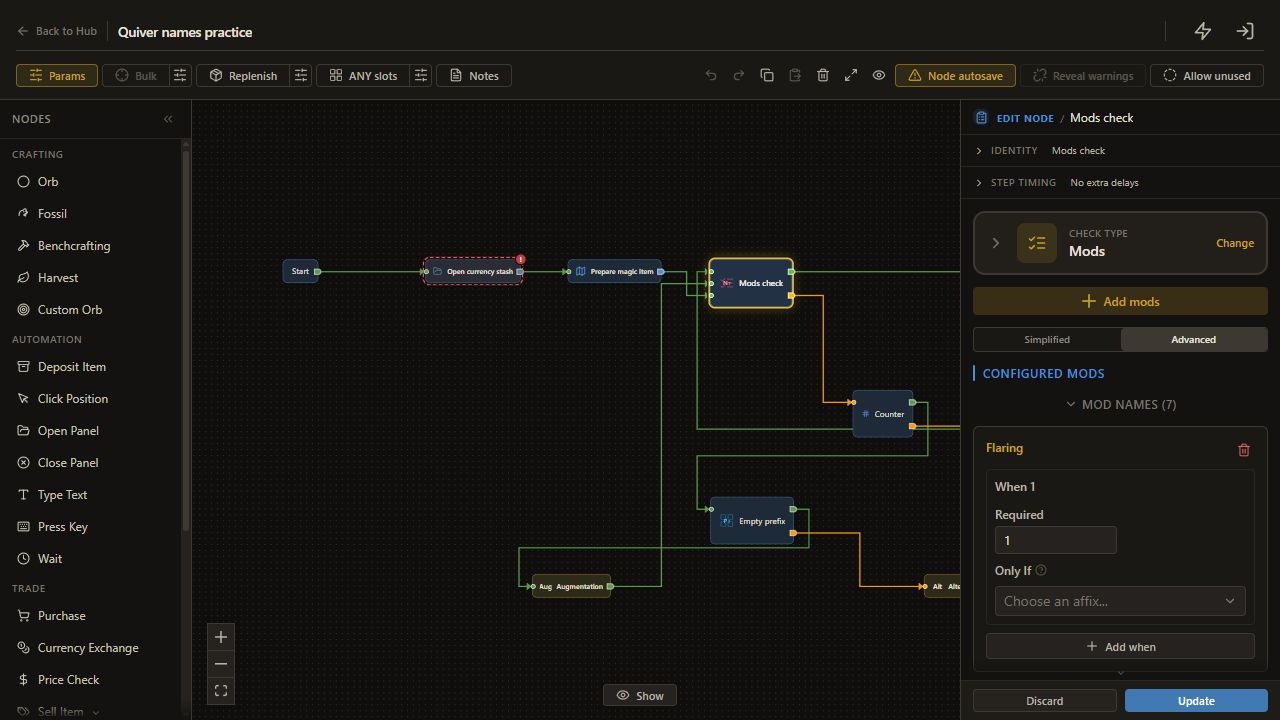
  47. 4. Make matching rows contribute

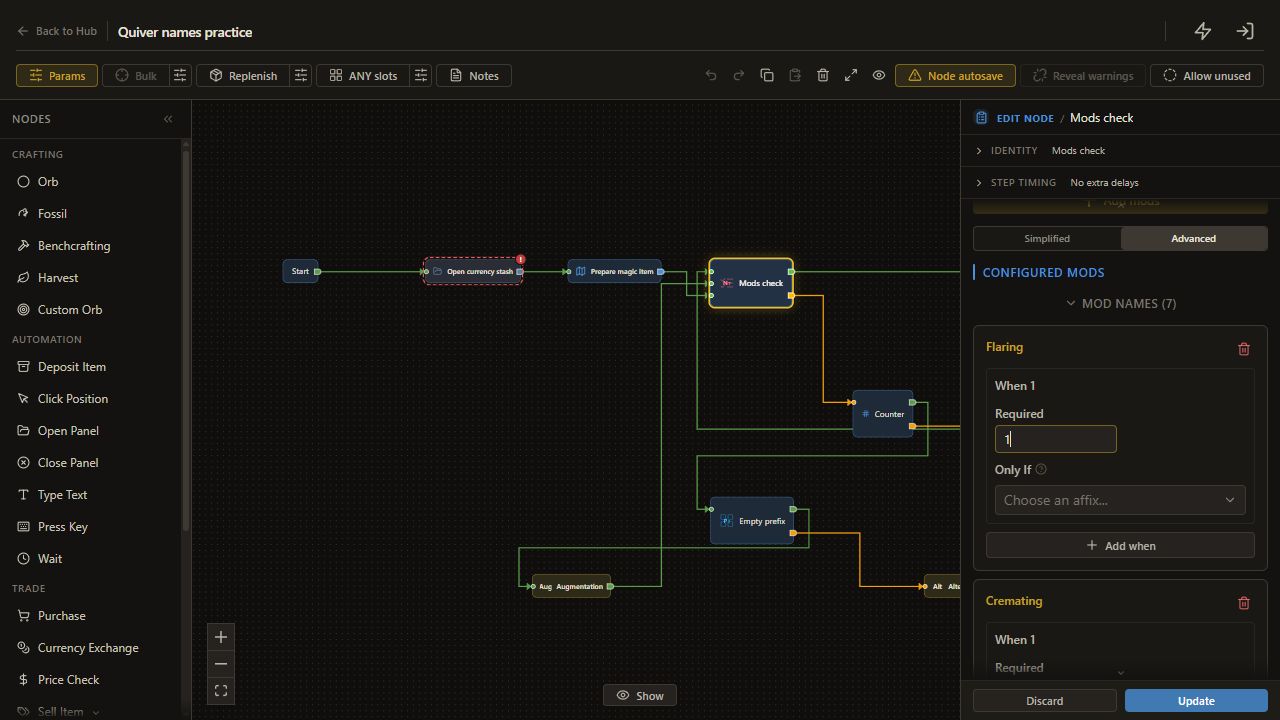
    47. Set Flaring Required

    On modifier row 1, Flaring, set Required to 1.

    Flaring has Required 1.

    Open full-size screenshot
  48. 4. Make matching rows contribute

    48. Read the name-row controls

    Mod-name rows expose Required and Only If. This example uses Required matching and leaves Score needed >= at 0.

    There is no Points field to edit on a mod-name row.

    Read and complete this step before continuing.

  49. 4. Make matching rows contribute

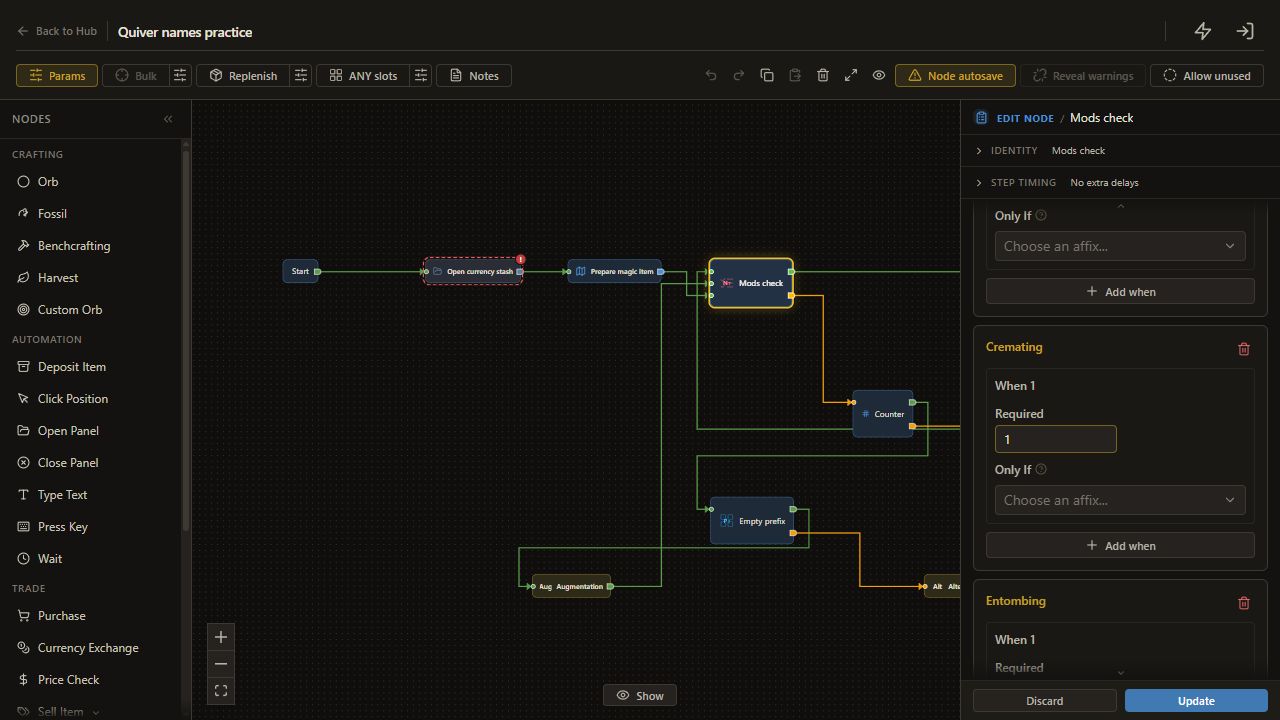
    49. Set Cremating Required

    On modifier row 2, Cremating, set Required to 1.

    Cremating has Required 1.

    Open full-size screenshot
  50. 4. Make matching rows contribute

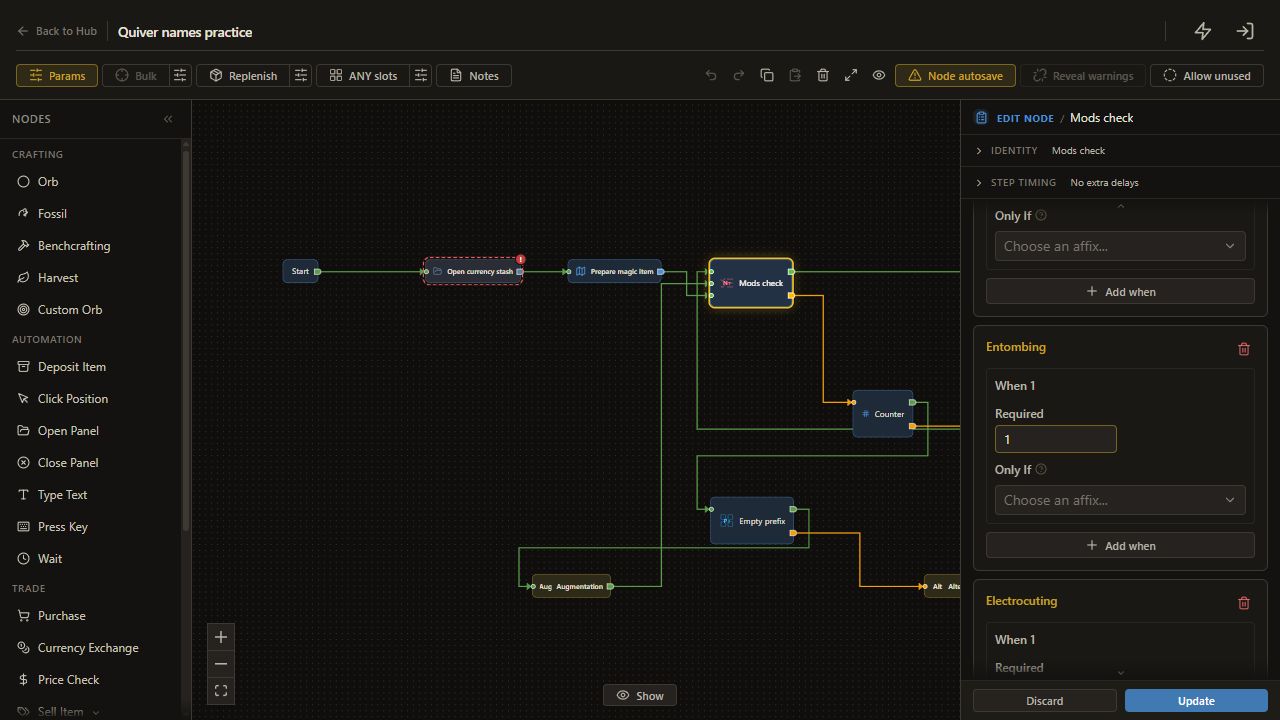
    50. Set Entombing Required

    On modifier row 3, Entombing, set Required to 1.

    Entombing has Required 1.

    Open full-size screenshot
  51. 4. Make matching rows contribute

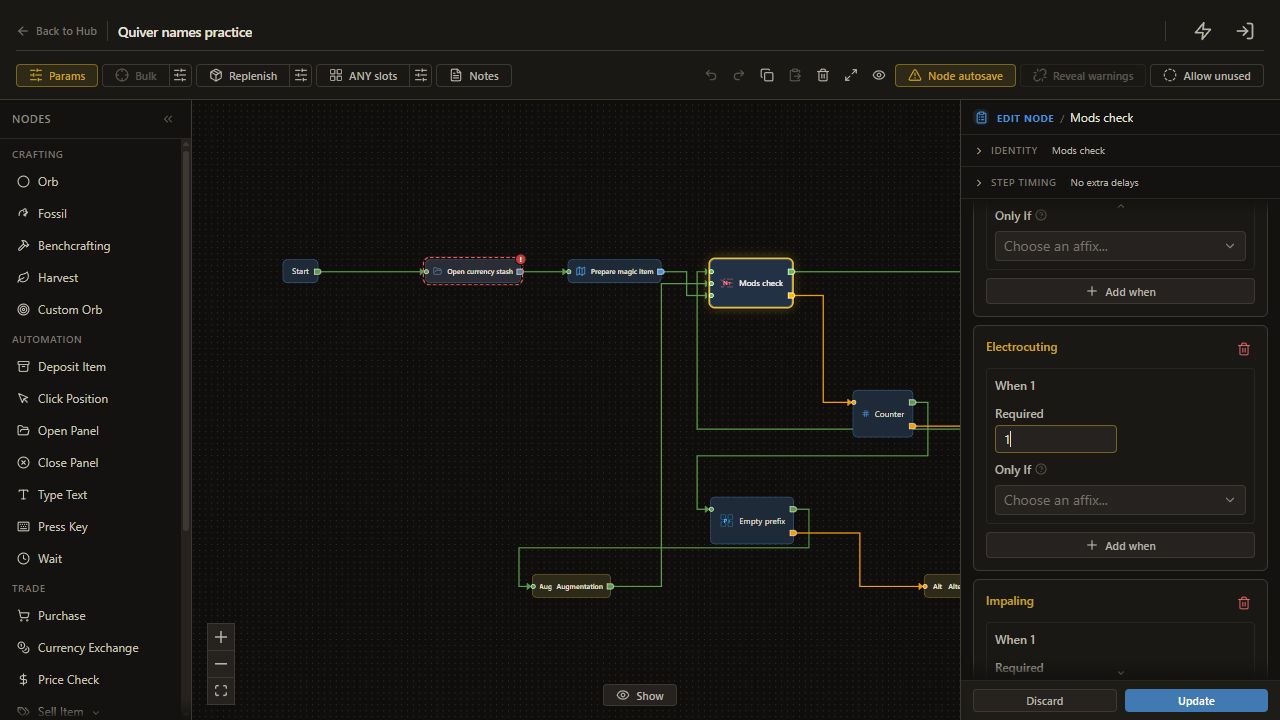
    51. Set Electrocuting Required

    On modifier row 4, Electrocuting, set Required to 1.

    Electrocuting has Required 1.

    Open full-size screenshot
  52. 4. Make matching rows contribute

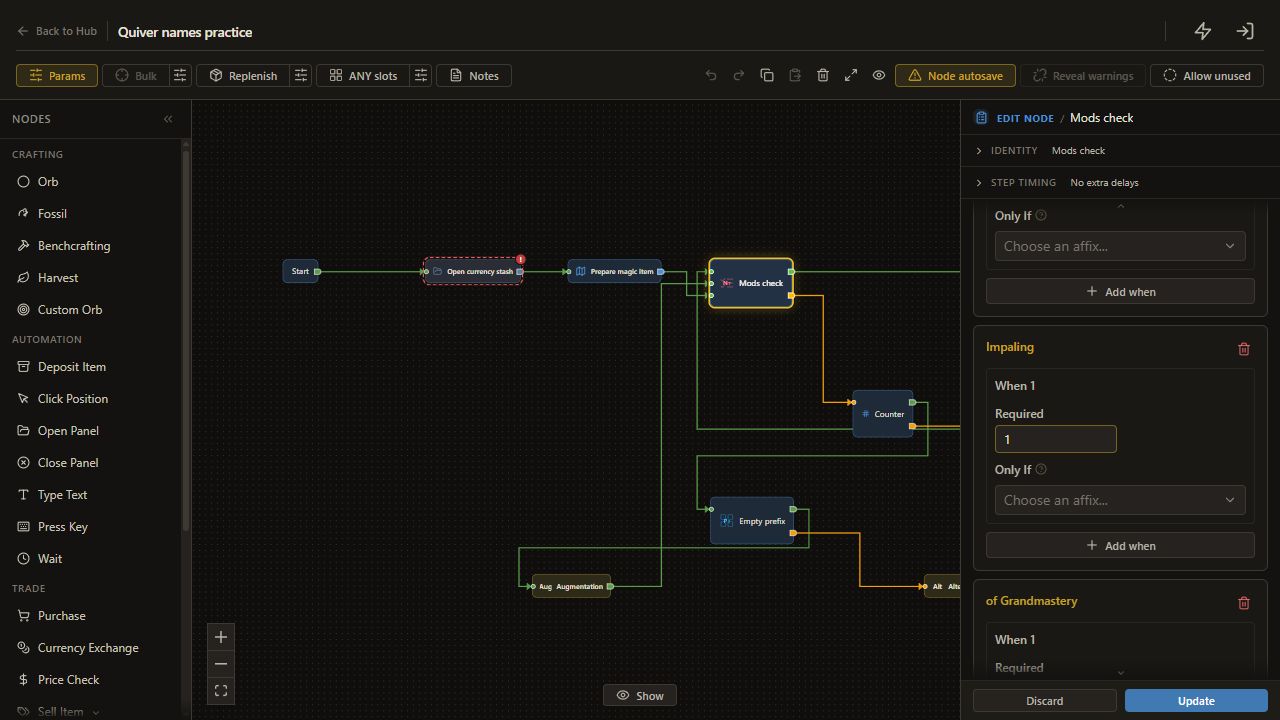
    52. Set Impaling Required

    On modifier row 5, Impaling, set Required to 1.

    Impaling has Required 1.

    Open full-size screenshot
  53. 4. Make matching rows contribute

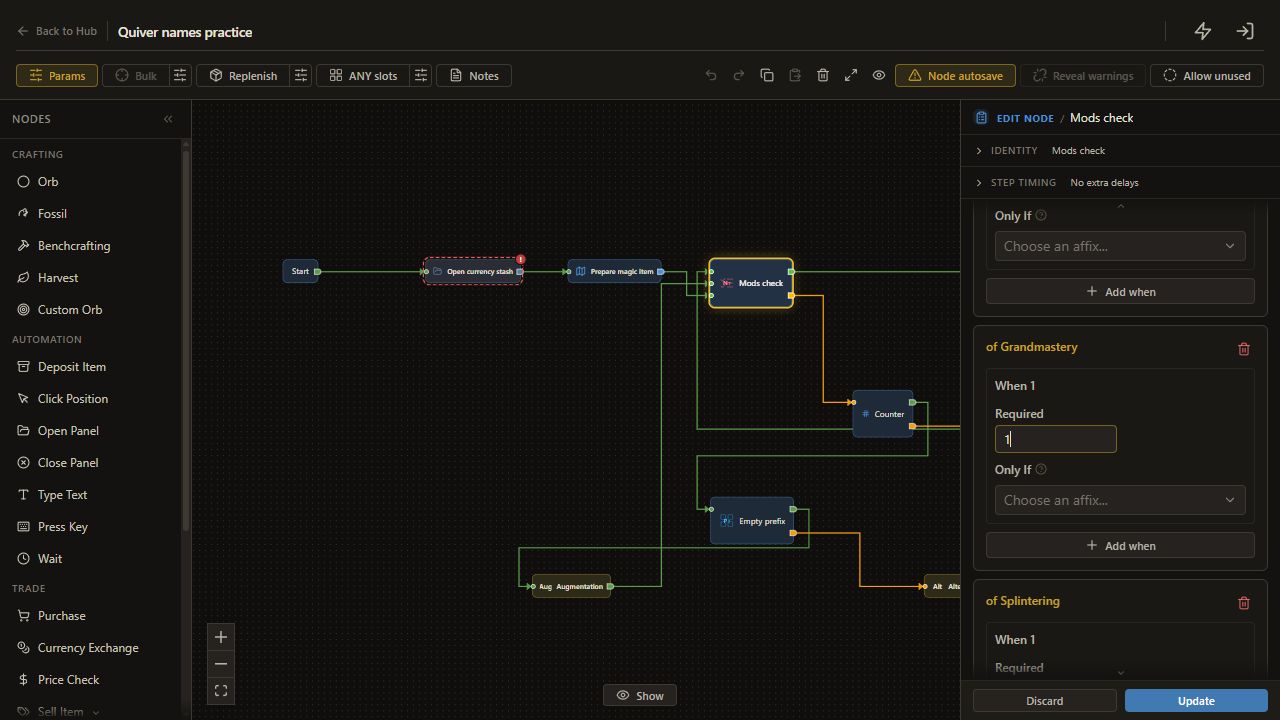
    53. Set of Grandmastery Required

    On modifier row 6, of Grandmastery, set Required to 1.

    of Grandmastery has Required 1.

    Open full-size screenshot
  54. 4. Make matching rows contribute

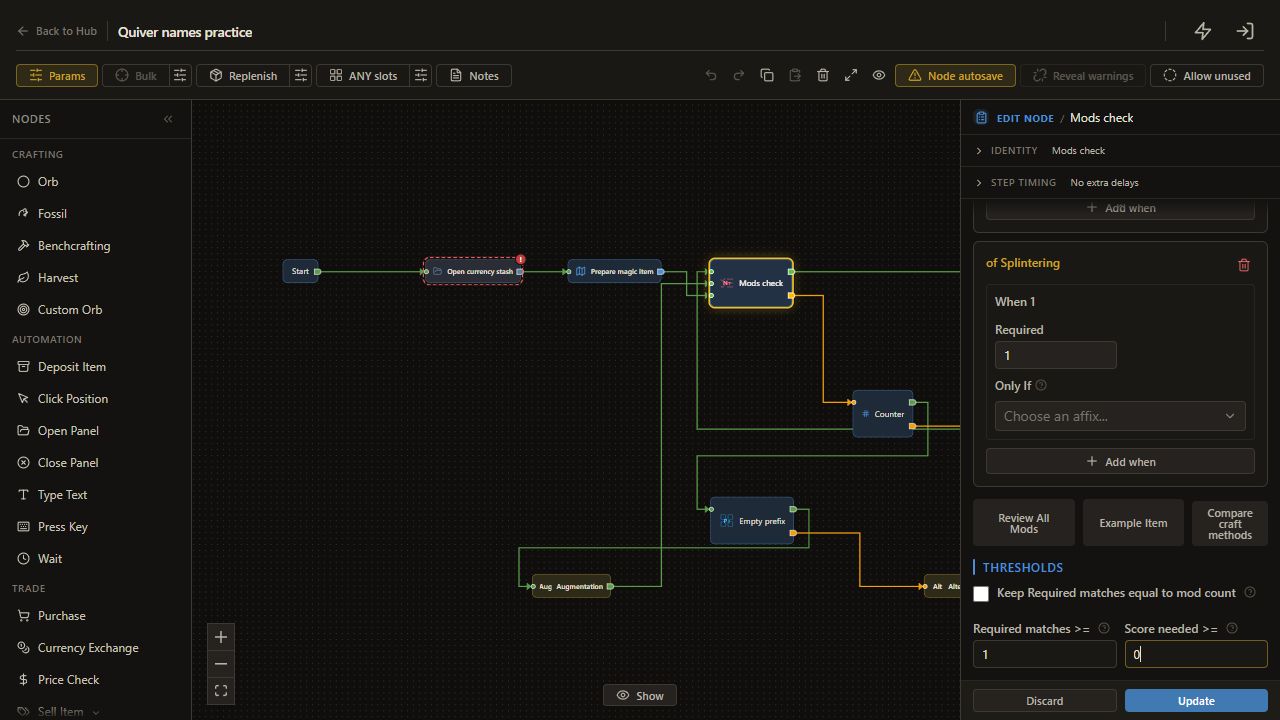
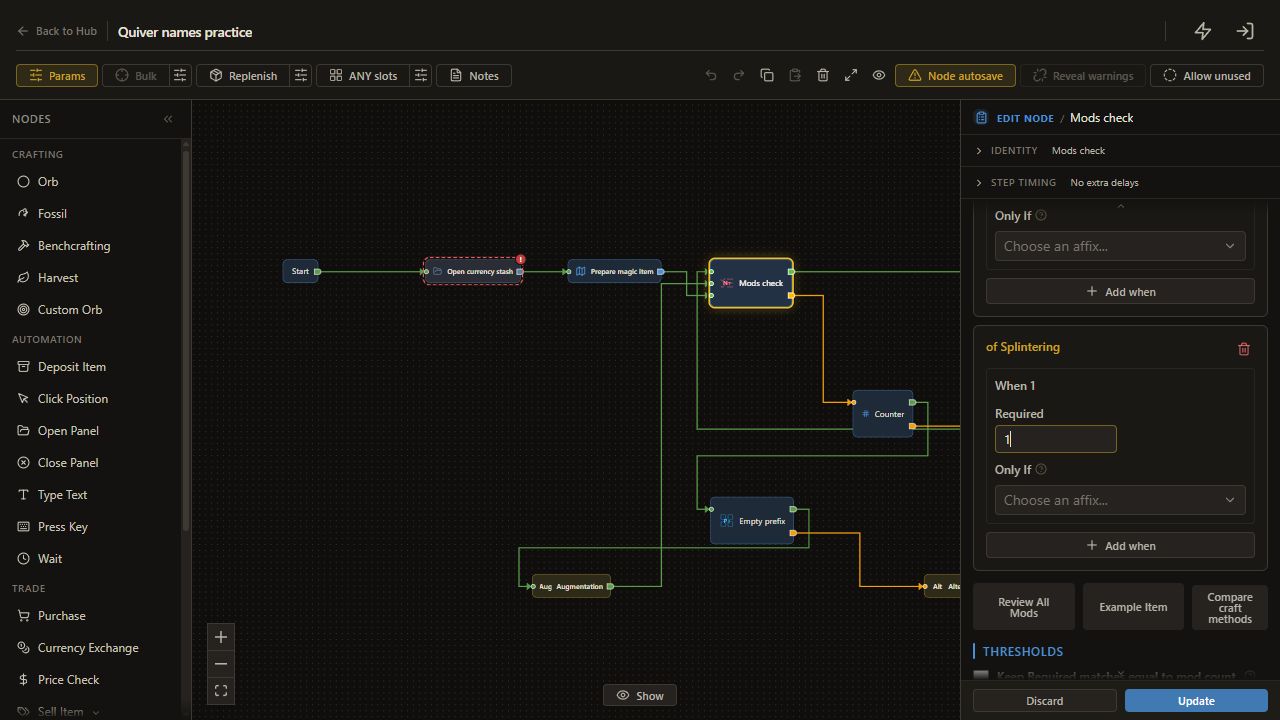
    54. Set of Splintering Required

    On modifier row 7, of Splintering, set Required to 1.

    of Splintering has Required 1.

    Open full-size screenshot
  55. 4. Make matching rows contribute

    55. Require one match

    Set Required matches >= to 1.

    Required matches >= keeps the selected value.

    Open full-size screenshot
  56. 4. Make matching rows contribute

    56. Use no score threshold

    Set Score needed >= to 0.

    Score needed >= keeps the selected value.

    Open full-size screenshot
  57. 4. Make matching rows contribute

    57. Connect Prepare magic item output to Mods check

    Drag from Prepare magic item's unnamed output to an input on Mods check.

    The next route reaches Mods check.

    Open full-size screenshot
  58. 4. Make matching rows contribute

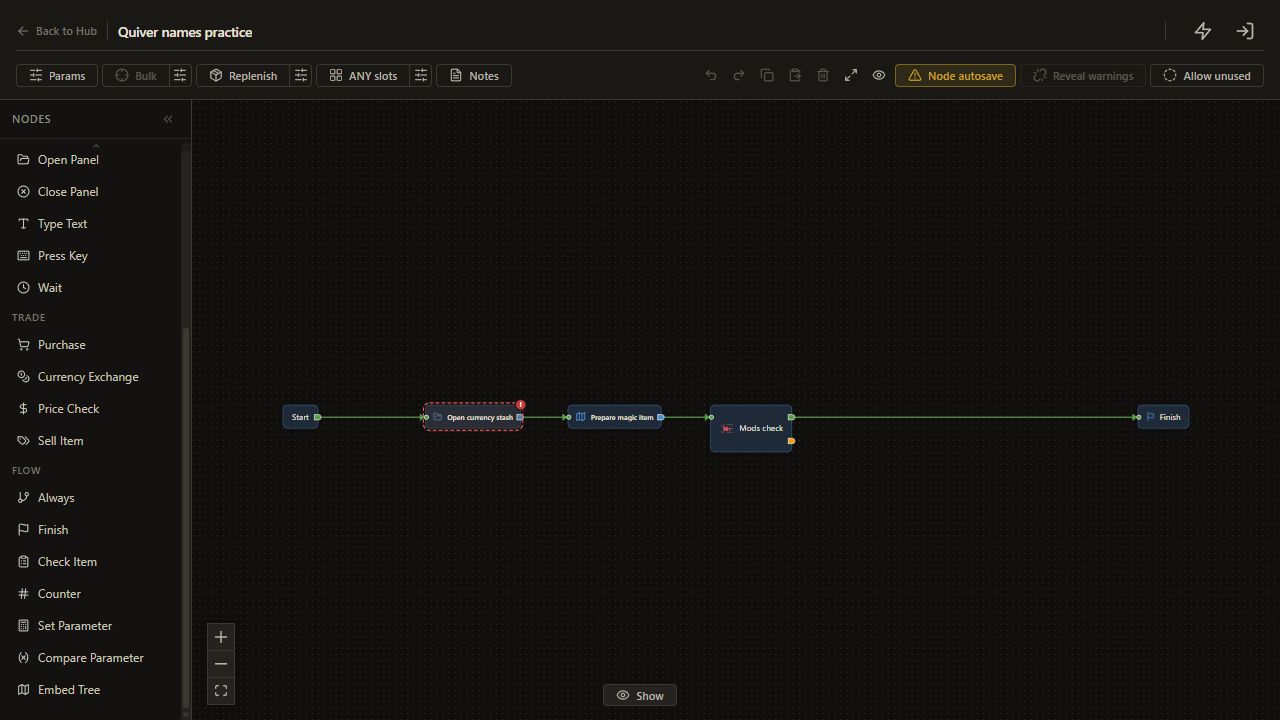
    58. Connect Mods check met to Finish

    Drag from Mods check's met output to an input on Finish.

    The met route reaches Finish.

    Open full-size screenshot
  59. 5. Add the bounded retry path

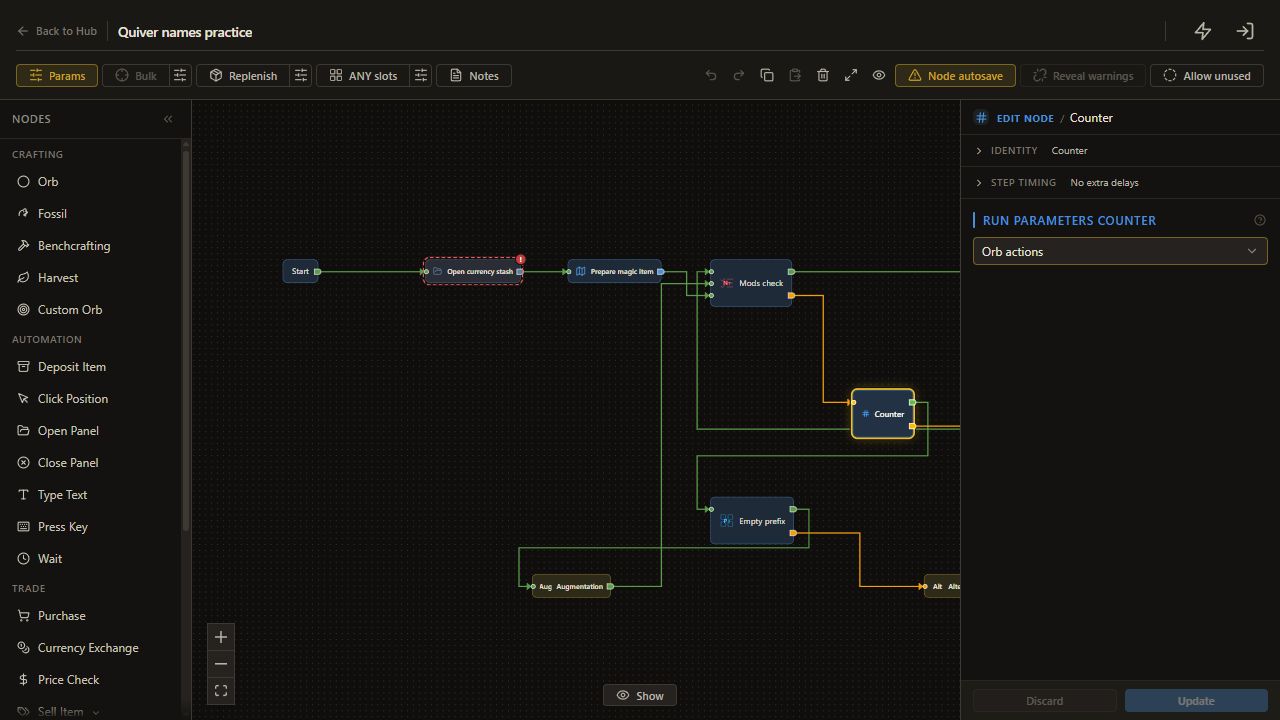
    59. Add Counter

    Choose Counter.

    The node appears on the canvas and its settings open.

    Open full-size screenshot
  60. 5. Add the bounded retry path

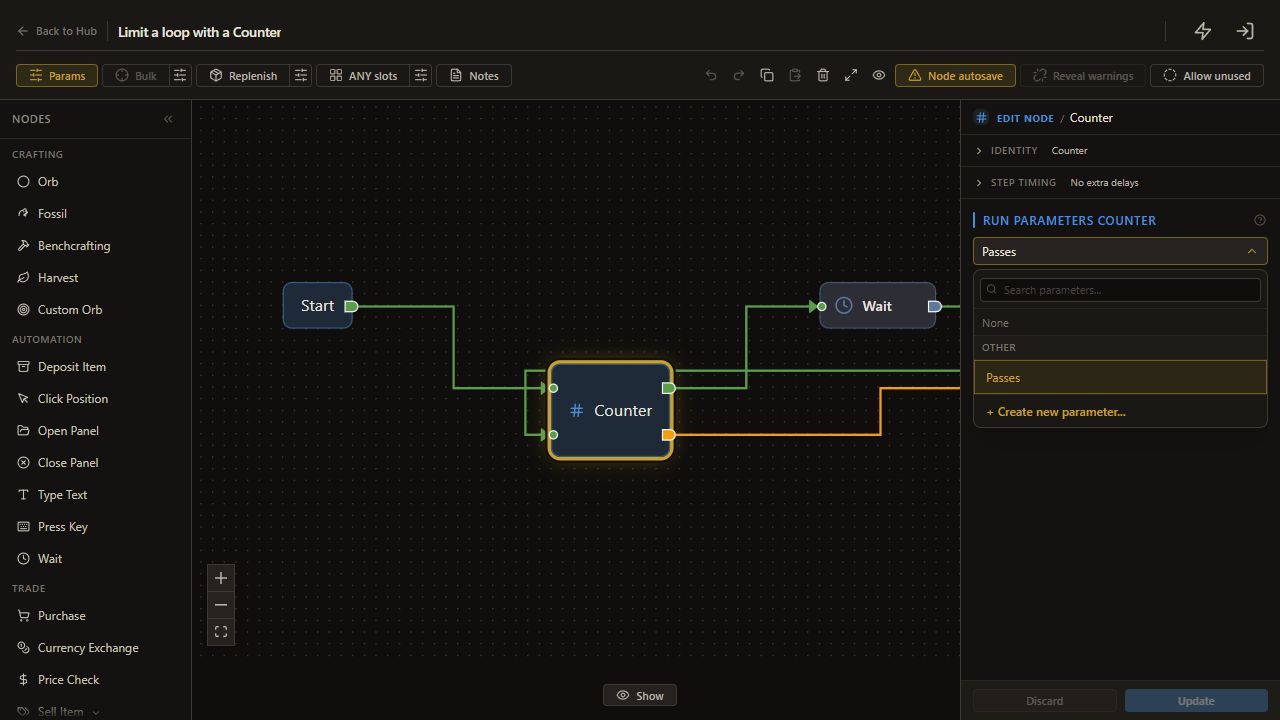
    60. Open the Run Parameters counter picker

    Open the Run Parameters counter picker.

    The parameter dropdown opens.

    Open full-size screenshot
  61. 5. Add the bounded retry path

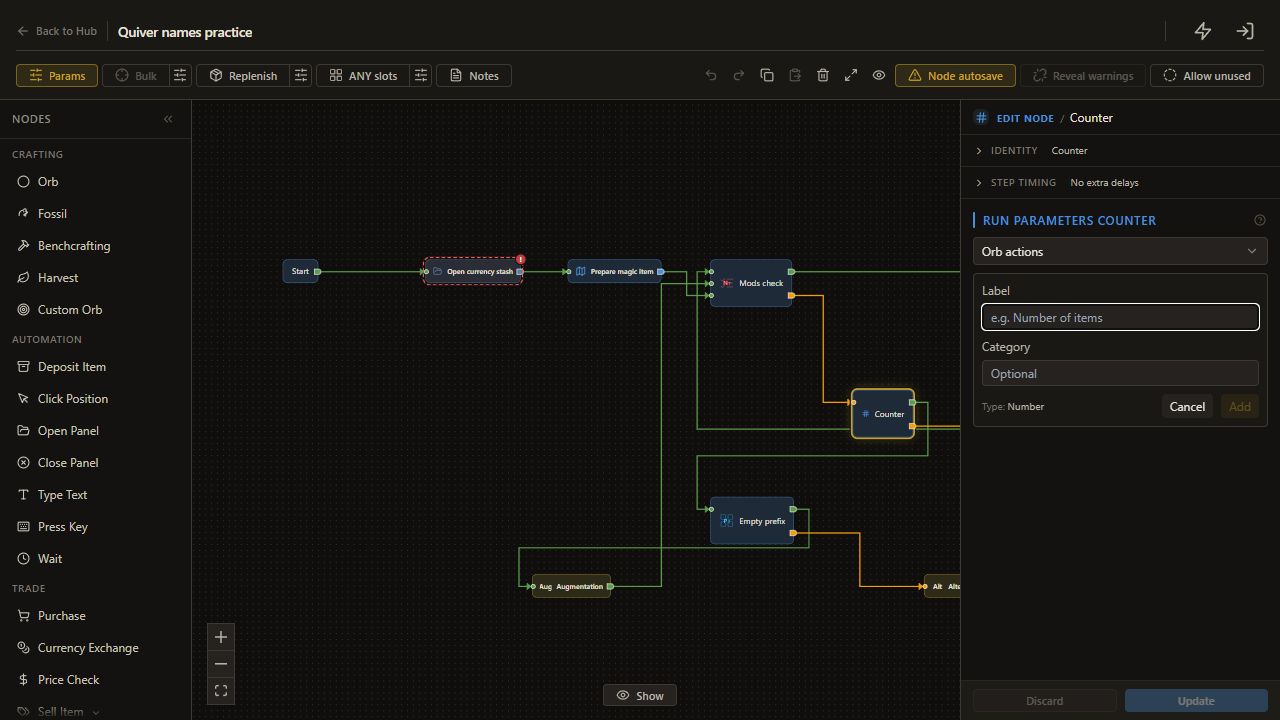
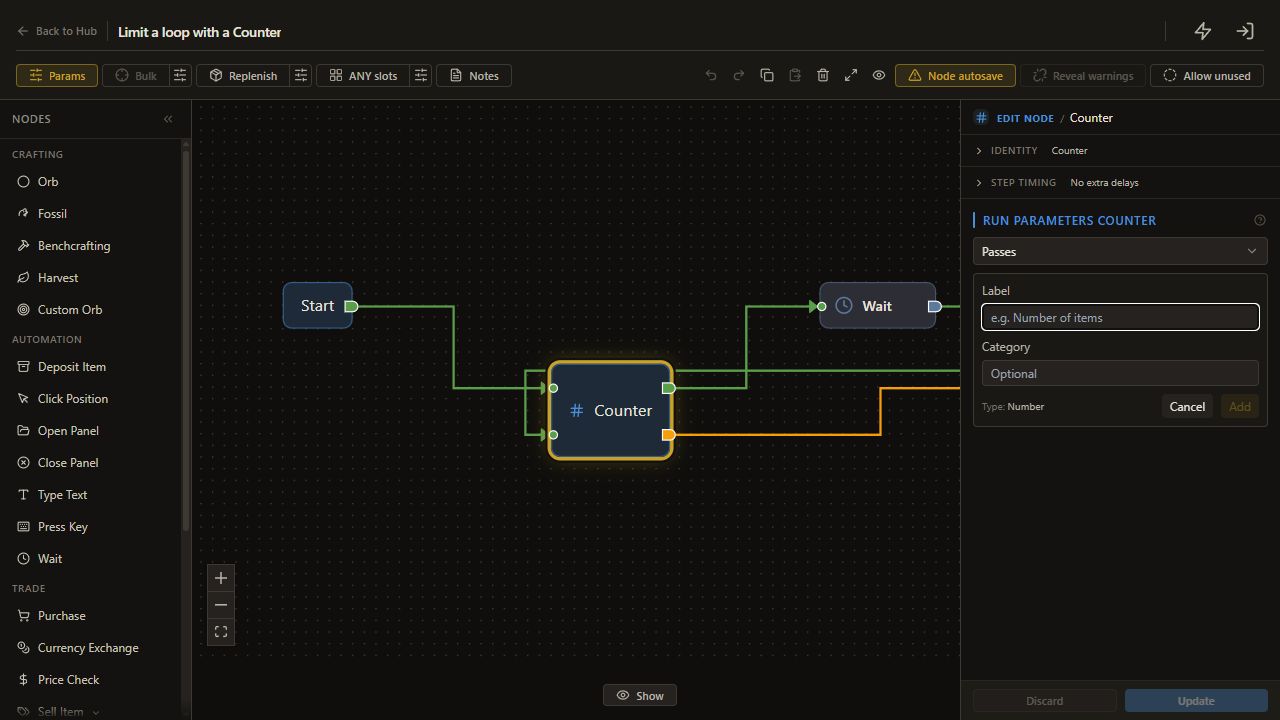
    61. Click Create new

    Click Create new.

    The inline Label and Add form opens.

    Open full-size screenshot
  62. 5. Add the bounded retry path

    62. Enter Orb actions in Label

    Enter Orb actions in Label.

    The new parameter label is filled.

    Open full-size screenshot
  63. 5. Add the bounded retry path

    63. Click Add

    Click Add.

    The Number parameter is created and automatically selected for Counter.

    Open full-size screenshot
  64. 5. Add the bounded retry path

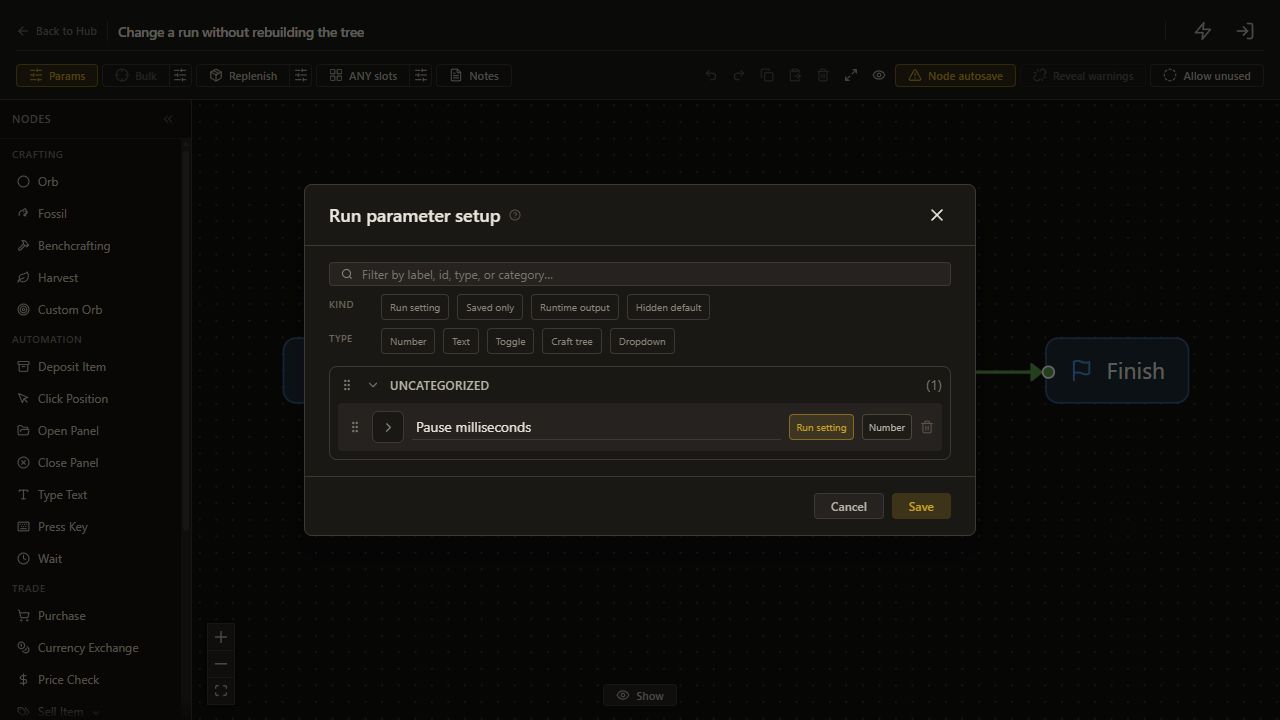
    64. Click Params in the editor toolbar

    Click Params in the editor toolbar.

    The parameter schema editor opens.

    Open full-size screenshot
  65. 5. Add the bounded retry path

    65. Expand Details for the Orb actions parameter

    Expand Details for the Orb actions parameter.

    The details for this parameter are visible.

    Open full-size screenshot
  66. 5. Add the bounded retry path

    66. Check that Orb actions has Type Number

    Check that Orb actions has Type Number.

    The parameter is a Number; Counter fixes this type during inline creation.

    Open full-size screenshot
  67. 5. Add the bounded retry path

    67. Set Kind to Run setting (with fallback default)

    Set Kind to Run setting (with fallback default).

    The budget remains editable before a run.

    Open full-size screenshot
  68. 5. Add the bounded retry path

    68. Enter 5 in Fallback default

    Enter 5 in Fallback default.

    The parameter has the stated fallback value.

    Open full-size screenshot
  69. 5. Add the bounded retry path

    69. Click Save in the parameter schema editor

    Click Save in the parameter schema editor.

    The schema is saved and the tree editor is visible.

    Open full-size screenshot
  70. 5. Add the bounded retry path

    70. Add Empty prefix

    Choose Check Item.

    The node appears on the canvas and its settings open.

    Open full-size screenshot
  71. 5. Add the bounded retry path

    71. Choose Empty Mods

    Choose Empty Mods.

    The Check Item template is Empty Mods.

    Open full-size screenshot
  72. 5. Add the bounded retry path

    72. Count open prefixes

    Choose Empty prefix quantity.

    Only prefix slots count.

    Open full-size screenshot
  73. 5. Add the bounded retry path

    73. Require one open prefix

    Set Minimum open slots to 1.

    Minimum open slots keeps the selected value.

    Open full-size screenshot
  74. 5. Add the bounded retry path

    74. Add Augmentation

    Choose Orb.

    The node appears on the canvas and its settings open.

    Open full-size screenshot
  75. 5. Add the bounded retry path

    75. Choose Augmentation

    Choose Augmentation.

    The Orb node uses Augmentation.

    Open full-size screenshot
  76. 5. Add the bounded retry path

    76. Add Alteration

    Choose Orb.

    The node appears on the canvas and its settings open.

    Open full-size screenshot
  77. 5. Add the bounded retry path

    77. Choose Alteration

    Choose Alteration.

    The Orb node uses Alteration.

    Open full-size screenshot
  78. 5. Add the bounded retry path

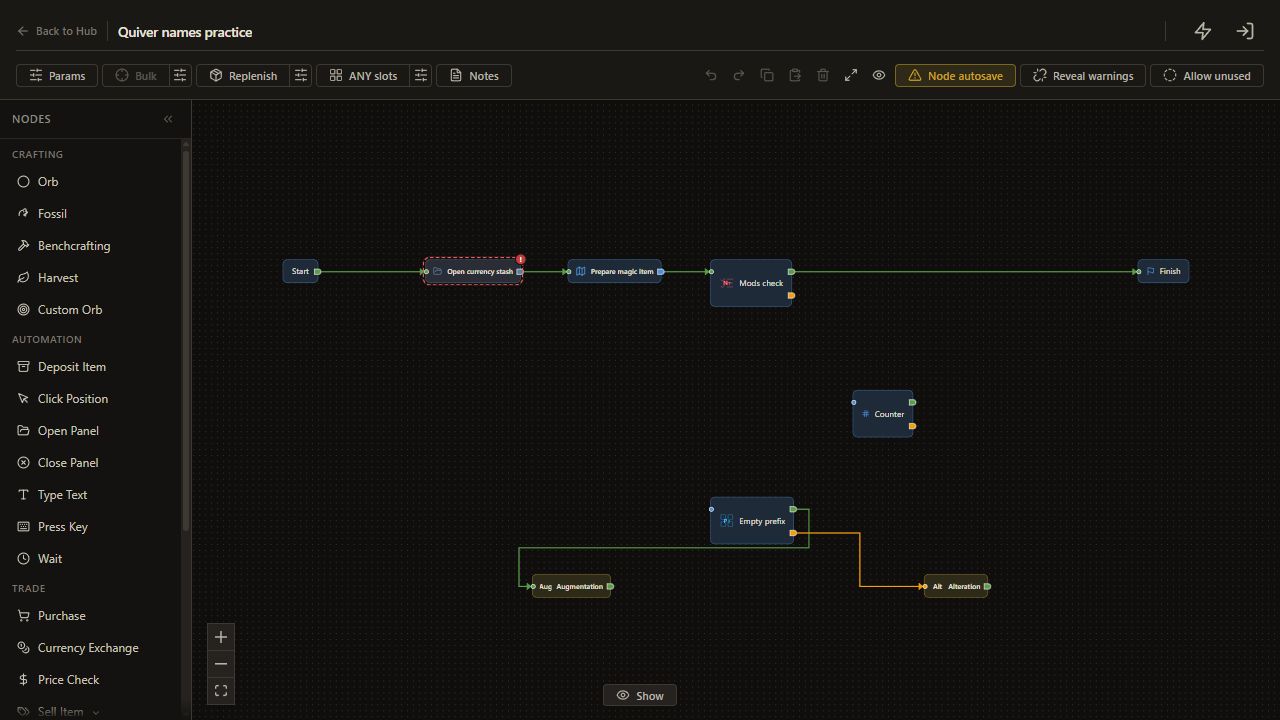
    78. Connect Empty prefix met to Augmentation

    Drag from Empty prefix's met output to an input on Augmentation.

    The met route reaches Augmentation.

    Open full-size screenshot
  79. 5. Add the bounded retry path

    79. Connect Empty prefix unmet to Alteration

    Drag from Empty prefix's unmet output to an input on Alteration.

    The unmet route reaches Alteration.

    Open full-size screenshot
  80. 5. Add the bounded retry path

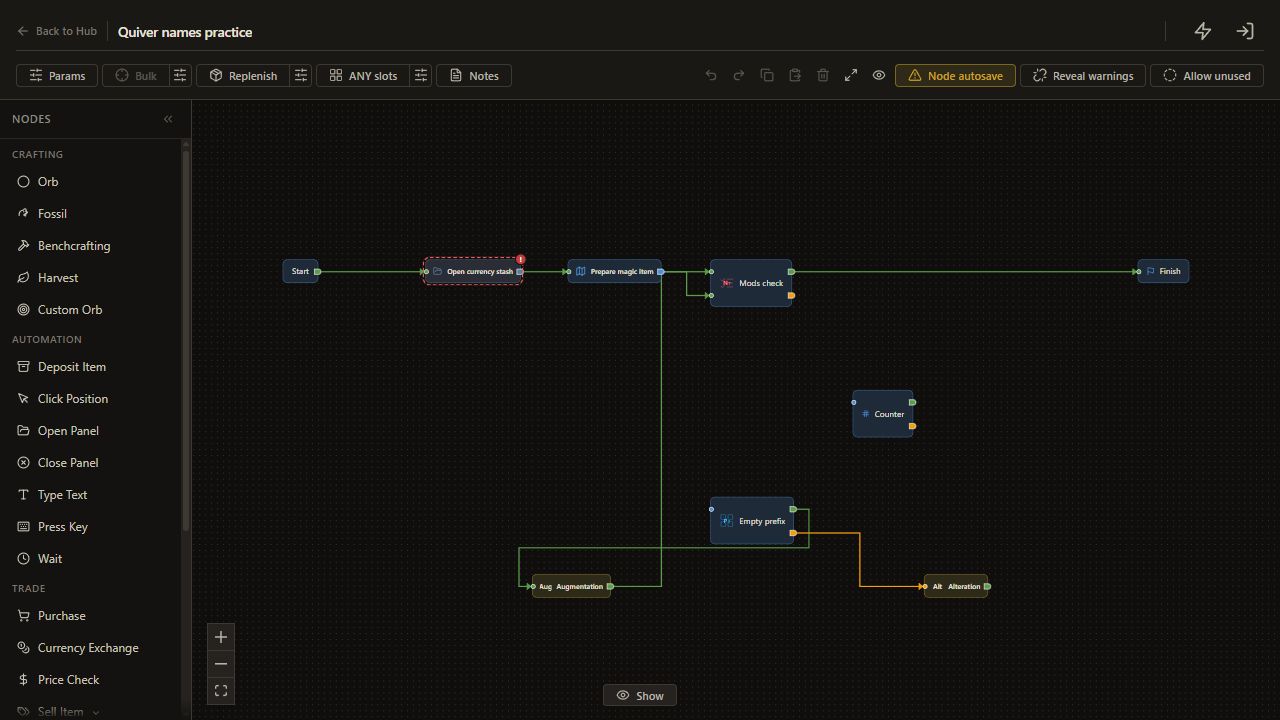
    80. Connect Augmentation output to Mods check

    Drag from Augmentation's unnamed output to an input on Mods check.

    The next route reaches Mods check.

    Open full-size screenshot
  81. 5. Add the bounded retry path

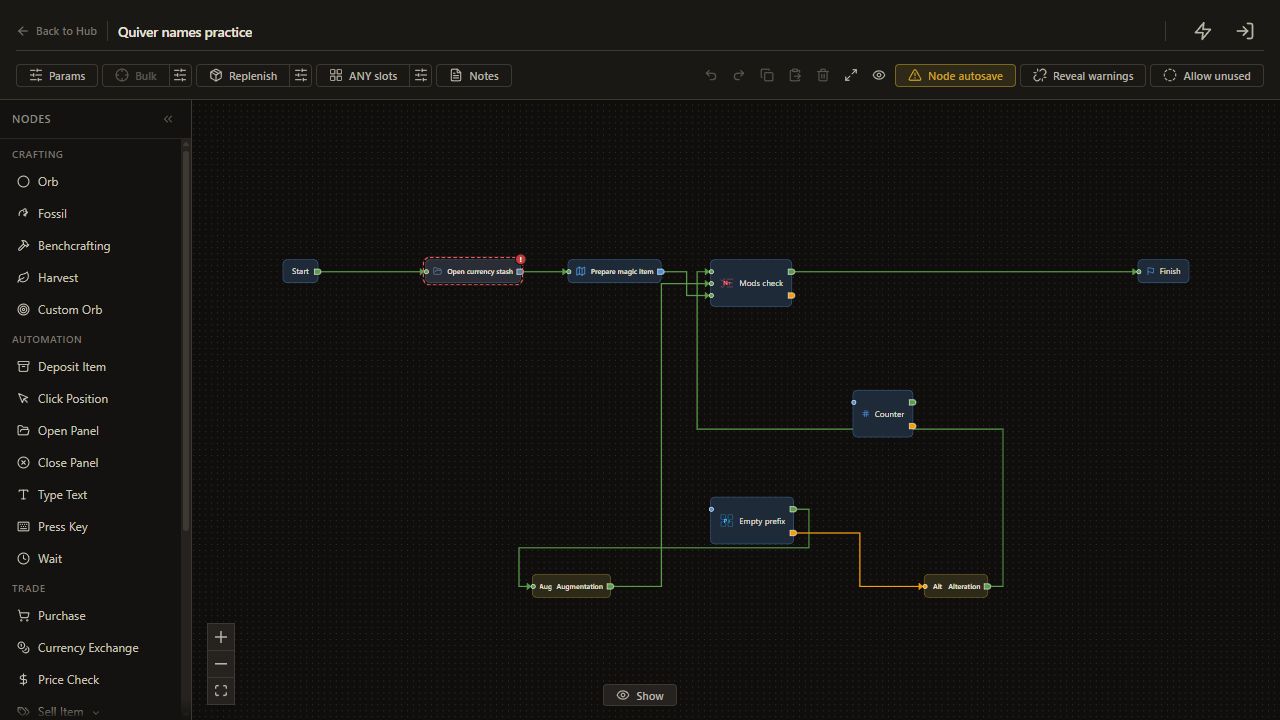
    81. Connect Alteration output to Mods check

    Drag from Alteration's unnamed output to an input on Mods check.

    The next route reaches Mods check.

    Open full-size screenshot
  82. 5. Add the bounded retry path

    82. Connect Mods check unmet to Counter

    Drag from Mods check's unmet output to an input on Counter.

    The unmet route reaches Counter.

    Open full-size screenshot
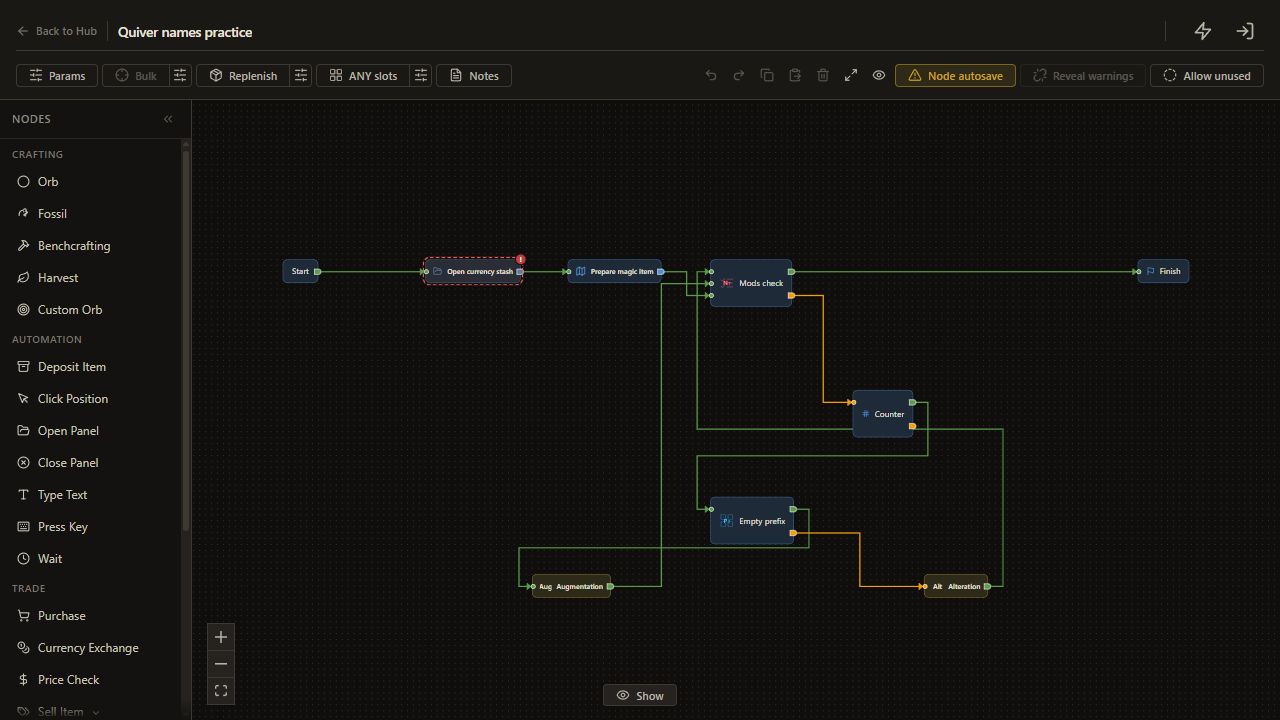
  83. 5. Add the bounded retry path

    83. Connect Counter met to Empty prefix

    Drag from Counter's met output to an input on Empty prefix.

    The met route reaches Empty prefix.

    Open full-size screenshot
  84. 5. Add the bounded retry path

    84. Connect Counter unmet to Finish

    Drag from Counter's unmet output to an input on Finish.

    The unmet route reaches Finish.

    Open full-size screenshot
  85. 6. Run and inspect the reason for Finish

    85. Check the node settings

    With Node autosave on, check the settings on the canvas. Switching nodes or using Back to Hub saves pending edits. If Node autosave is off, use Add to Tree for new nodes and Update for edits.

    The graph contains the configured nodes.

    Read and complete this step before continuing.

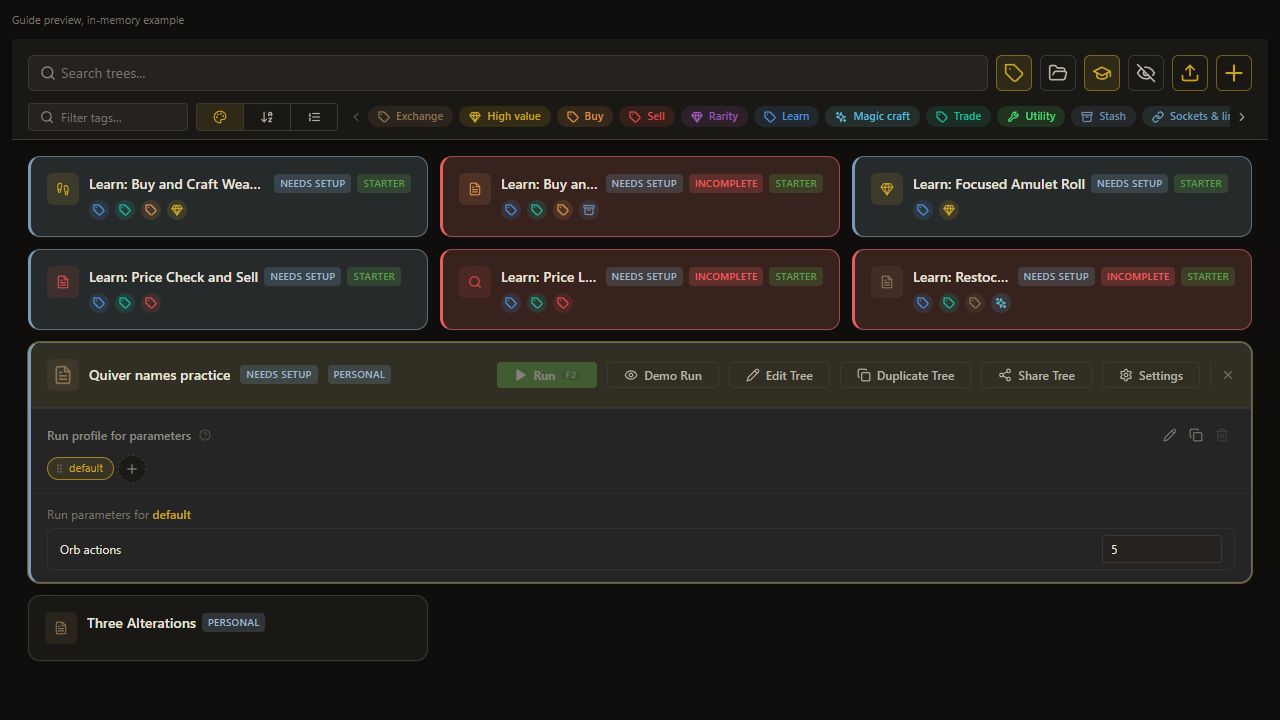
  86. 6. Run and inspect the reason for Finish

    86. Return to the Hub

    Choose Back to Hub.

    The personal tree is shown.

    Open full-size screenshot
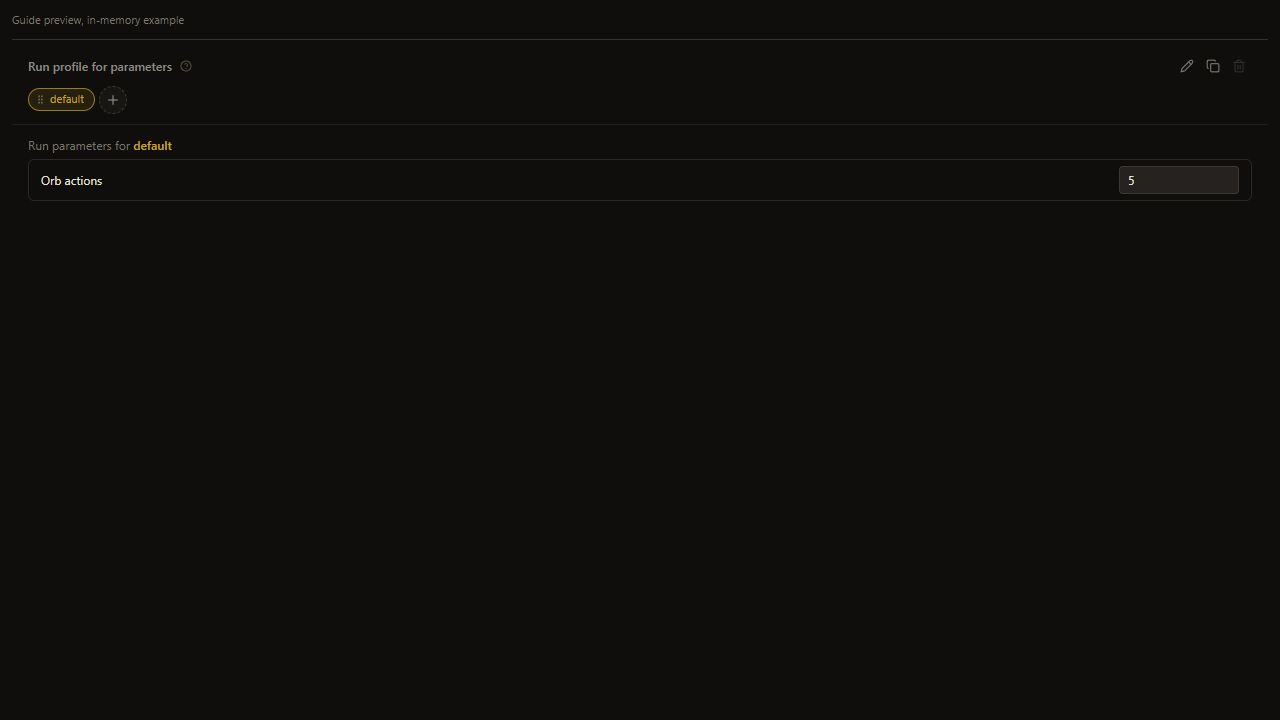
  87. 6. Run and inspect the reason for Finish

    87. Find saved inputs

    Select the tree on the Hub and find its Run Parameters section.

    Saved inputs are visible.

    Read and complete this step before continuing.

  88. 6. Run and inspect the reason for Finish

    88. Save Orb actions

    Set Orb actions to 5.

    Orb actions keeps the selected value.

    Open full-size screenshot
  89. 6. Run and inspect the reason for Finish

    89. Wait for Saved

    Wait until Run Parameters shows Saved.

    The inputs are persisted.

    Read and complete this step before continuing.

  90. 6. Run and inspect the reason for Finish

    90. Start the test

    On the selected Hub card, choose Run after checking the real setup.

    The configured run can begin on the prepared item.

    Open full-size screenshot
  91. 6. Run and inspect the reason for Finish

    91. Inspect the ending

    Use a prepared magic item so the child returns without spending. Keep the mouse still, then compare names with Logs.

    Target match and budget exhaustion remain distinct.

    Complete and verify this step in the stated app or game.

  92. Check the result

    92. Open Logs

    Choose Logs.

    The actual sequence and exit can be inspected.

    Open full-size screenshot
  93. Check the result

    93. Inspect the actual result

    Compare accepted names with the retained group or row list, and count combined Augmentation/Alteration applications.

    At most five retry actions. Child conversion spend falls outside this allowance.

    Complete and verify this step in the stated app or game.

  94. If it does not work

    94. Review if it does not work

    - **A visible name contributes zero:** reopen Advanced and inspect the row's Required value. - **Every row must match:** change the final threshold to 1 and disable automatic syncing. - **Wrong retry branch:** check [Empty Mods](empty-mod-slots.md) and copied prefix labels.

    The section context and checks are preserved.

    Read and complete this step before continuing.

  95. Next guide

    95. Review next guide

    [Combine alternatives with mandatory mods](mod-groups.md).

    The section context and checks are preserved.

    Read and complete this step before continuing.

On this page

At a glance

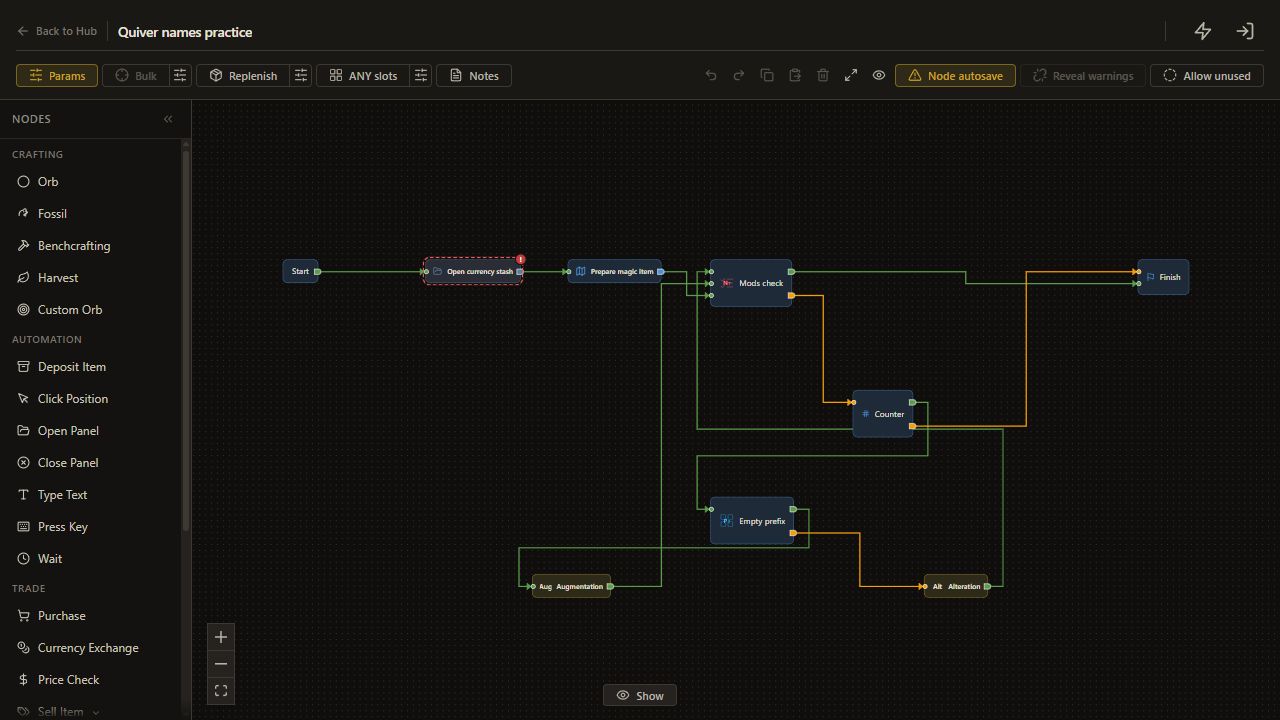
Quiver Roll prepares magic rarity, checks a list of modifier names, then chooses Augmentation or Alteration from an empty-prefix check. Its saved target rows need attention: all eight historical rows have Required: 0, while the check requires a total of 1. Set the contributions explicitly before running a copy.

Before you start

Complete setup, configure Alteration and Augmentation, and enable Orb stock guard. Prepare a disposable identified, uncorrupted magic quiver. Verify advanced copied item information for name and prefix checks.

1. Create a personal practice tree

Press + on the Hub, name it Quiver names practice, and open Edit Tree.

Click the sliders button beside Bulk in the editor toolbar, labeled Configure bulk / grid settings. Choose Current item, then click Save. The dialog closes and the tree uses one item.

Select Current item.

The source is Learn/High Value/Quiver Roll.json, titled Learn: Quiver Roll in saved Hub metadata. These steps correct its target contributions and add a Counter. The sample stores disabled bulk settings; confirm your own Current item mode.

2. Prepare the entry path

Add Open Panel to ensure the stash is open on the currency tab. Add Embed Tree and select your own saved magic-rarity child, following Force magic rarity.

Connect Start → panel step → Embed Tree. The sample references the internal Learn RarityForcerMagic helper, which is hidden from normal pickers. Creating a personal child gives this practice tree a selectable dependency.

3. Enter the name list

Add Check Item > Mods, select the quiver item type, and use modifier-name matching. The sample lists Flaring, Cremating, Entombing, Electrocuting, Impaling, of Grandmastery, of Splintering and Fecund.

Select each available name and click Add mod name before searching for the next. Fecund is absent from the current catalog, so skip it in this practice tree. Keep only names you intend to accept and can select for your item scope. Check separately whether your base can roll them; the list makes no value claim.

4. Make matching rows contribute

In Advanced, set each retained row to Required: 1. Turn off automatic Required threshold syncing and set Required matches >= 1 and Score needed >= 0. Mod-name rows expose Required and Only If. This example uses Required matching, so leave the score threshold at zero.

The saved sample's zero-weight rows cannot supply its Required total of 1. Increasing the threshold does not repair that. With the explicit values above, one matching retained name contributes 1 and can pass. Connect Embed Tree to this check and its met output to Finish.

Set Required to 1 separately on each retained row: Flaring, Cremating, Entombing, Electrocuting, Impaling, of Grandmastery and of Splintering. There is no Points field on these mod-name rows.

5. Add the bounded retry path

Add a Counter using Number parameter Orb actions, fallback 5. Connect Mods unmet → Counter, Counter unmet → Finish, and Counter met → Empty Mods set to Empty prefix quantity: 1.

Connect Empty Mods met → Augmentation and unmet → Alteration. Return both orb outputs to Mods. This permits at most five combined retry applications. The rarity child runs before Counter, so any conversion spend is outside that allowance. Start with the prepared magic quiver for this test.

In Counter, open Run Parameters counter, click Create new, enter Orb actions in Label, then click Add. Counter creates a Number parameter and selects it automatically. Open Params, expand Details for Orb actions, check Type: Number, keep Kind as Run setting (with fallback default), enter 5 in Fallback default, then click Save.

6. Run and inspect the reason for Finish

Save Orb actions as 5 on the Hub and wait for Saved. Confirm Current item, start on the quiver, then compare Logs with its modifier names.

Check the result

A target exit should show a name contributing Required 1. A budget exit can leave the target unmet. Neither exit confirms market value or a finished rare craft.

If it does not work

  • A visible name contributes zero: reopen Advanced and inspect the row's Required value.
  • Every row must match: change the final threshold to 1 and disable automatic syncing.
  • Wrong retry branch: check Empty Mods and copied prefix labels.

Next guide

Combine alternatives with mandatory mods.

Keep learning

Browse all guides

For setup help, the installer or license keys, join the official Discord. Sales and key issues: DM PathOfRolling. Check the account before paying; watch for impostors.